
Finally....gue menyentuh sang edible playdough alias fondant!! Setelah hampir kurang lebih 20 tahun gue cuman bisa memandangi cake decorating dengan fondant di buku-buku Wilton Ibu gue dan menyimpan rasa penasaran itu hingga detik ini, sampe gue ketemu blognya mbak Luluk "sang ratu fondant" :) yang makin bikin penasaran dan mendorong gue untuk mencobanya...hehehe...norak ya!
Gue inget banget jaman kecil dulu, saat memandangi yearbook Wilton, beribu pertanyaan berseliweran di otak gue. "Ini didekor pake apa ya?" "Ini kuenya kok mulus banget, ditutup pake apa ya?" "Ih lucu banget sih, kok kayak playdough tapi bisa dimakan." Rasanya pengen banget tau saat itu, sayang Ibu gue sendiri gak tau dan gak ngerti apa gerangan si "benda kayak lilin yang bisa dimakan" ini.
Waktu terus berlalu dan setiap kali gue ngeliat buku-buku cake decorating import (waktu itu fondant gak populer di Indonesia dan belum banyak yang pake), kembali gue teringat dan tergiur ingin menyentuhnya. Sampe akhirnya sekarang gue punya kesempatan berkenalan dengan fondant.
Proyek pemanasannya, belum berani bikin dekor yang gede-gede. Pengen tau dulu gimana karakter si fondant ini. Jadilah gue bikin dekor mini wortel untuk Carrot Cake gue. Itupun diawali dulu dengan pembekalan diri browsing-browsing di internet tentang segala seluk beluk fondant (tips dan trik klik di sini) plus ber"guru" lewat mbak Luluk *makasih mbak, aku padamu :)* dan tanya-tanya sama seorang guru di Bogasari Baking Center. And satu lagi ditambah modal nekat!
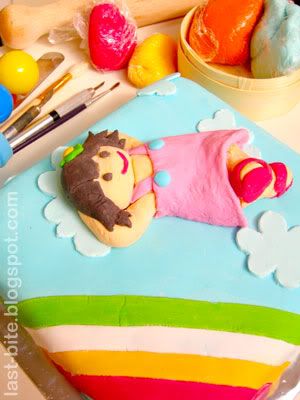
Pas kebetulan Pinot cuti, gue merasa lebih semangat ngerjain fondant, karena ada yang nemenin Arwen. Akhirnya menjelang hari yang ditentukan, gue udah mempersiapkan temanya. Inspirasi yang paling gampang...gak jauh-jauh, ya siapa lagi kalo bukan anak sendiri :). Idenya gue bikin imajinatif aja, si Arwen lagi bobok-bobokan di atas awan bareng sama pelangi.
Hasilnya masih jauh dari sempurna, tapi setidaknya rasa penasaran gue terbayarkan!
Dan sebagai anak bawang yang baru aja nyoba, gue mau berbagi pengalaman (gue bukan pakar, tapi inilah pelajaran yang gue dapet setelah nekat bermain dengan fondant). Sorry for today no recipe yah, cake-nya cuman sponge cake diiisi selai blueberry aja kok. So, ini kesimpulan dan beberapa tips yang bisa gue share :
1. Setelah membeli fondant simpan dalam wadah tertutup kedap udara dan simpan dalam suhu ruang atau ber-ac. Kalo dibiarkan terbuka, dia akan mengeras dan jika disimpan dalam kulkas akan lumer/lembek.
2. Tentukan tema beberapa hari menjelang pembuatan kue atau dekorasi. Ini penting banget supaya apa yang kita kerjakan jadi lebih terarah dan terfokus. Banyak ide bisa ditemui dalam kehidupan sehari-hari, contohnya tema dapur, tema minum teh di sore hari, anak-anak bermain di halaman, bunga, tanaman, dsb. Atau mau yang imajinatif sekalian...pokoknya liar aja dalam mencari ide. Syukur-syukur punya akses ke internet, jangan males browsing dan tanya-tanya soal ide sama mbah Google.
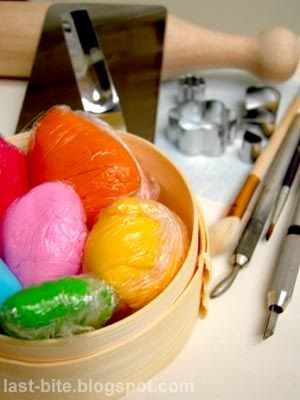
3. Sehari menjelang pembuatan kue, bagi-bagi fondant kemudian beri warna sesuai dengan kerangka tema yang akan kita aplikasikan. Bungkus rapat kembali (gue bungkus pake multipurpose cling film terus dimasukin ke dalam zipper bag) fondant-fondant yang belum terpakai Lalu, sebisa mungkin bikin item-item dekor seperti bunga-bunga, figure orang, pohon, dll, pada hari itu juga. Jadi pada saat hari H, kita tinggal covering kue dan menempelkan item-item yang udah kita bikin sehari sebelumnya. Ini penting banget supaya kita gak grabak grubuk *apa ya istilahnya?* di dapur saat harus nyiapin kue tapi disaat yang bersamaan harus konsentrasi juga ke fondant...kecuali kalo Anda tipe multitasking...hehehe...kalo daku mah susah, harus konsen satu-satu :). Selain itu, beberapa bentuk seperti bunga dan pita, memang lebih bagus kalo didiamkan sehari dulu, biar bentuknya mantap.
4. Yang perlu dicatat, pewarnaan fondant sama dengan pewarnaan icing. Makin lama didiamkan warnanya menjadi lebih tua loh, jadi jangan buru-buru netesin warna banyak-banyak.
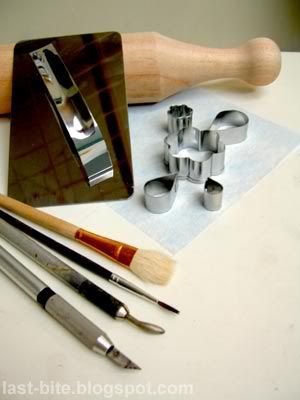
5. Basicnya gak perlu tools macem-macem. Sediain aja rolling pin. Sisanya pake yang ada di rumah, seperti kuas lukis, cetakan kue kering, cutter kecil, dll, pokoknya berkreativitas dengan barang-barang di sekitar kita-lah. Gue pake tools bekas ngerjain tanah liat dan paperclay, yang kebetulan gue punya..hehehe...tapi tenang sudah disucihamakan.
6. Selalu siapkan air di mangkuk dan tepung maizena di wadah. Ini bakal jadi senjata selain tools yang kita pake. Prinsipnya, kalo fondant udah kaku basahi atau ciprati air (gak usah banyak-banyak sampe banjir) dan sebaliknya kalo fondant mulai lembek lengket-lengket di tangan, gunakan tepung maizena.
7. Taburi meja kerja dan rolling pin dengan tepung maizena kalo mau menggiling.
8. Jangan tinggalkan batita dengan fondant sendirian, kalo gak mau dibejek-bejek kerjaan kita..hwahahaha...nyaris gue! Karakter Arwen yang udah hampir slese mo digiles pake rolling pin sama si Arwen :D.
9. Terakhir...gue gak mau bikin dekor cake pake fondant untuk konsumsi sendiri, gak tega makannya bow!!!! Hwahahahaha!!
Jangan takut mencoba, ternyata it was really fun!
* * *
Finally... I touched the edible playdough aka fondant!! After 20 years of could only looking at fondant-decorated cakes inside my mom's Wilton cake books and kept my curiousity until this moment, until I finally found the blog of fondant queen, Mbak Luluk :) which only kept me more curious and curious, and tempted me to try the recipe.
I still remember when I was a kid, looking at the Wilton yearbook, a thousand questions filling in my head. "What was the thing that used as cake decoration?" "It's so smooth, what was the topping of this cake?" "It's quite unique, looked like playdough, but it's eatable playdough. I really wanted to know at that time, too bad my mother didn't know and understand what this that thing that looked like wax but eatable.
Times went by and everytime I looked at various books on cake decorating, which was imported (in the past fondant was not popular in Indonesia and not many people used it for cake), I always remember and so eager to touch it. Until now I just had a chance to get to know more about fondant.
On the warming up project, I was not confident enough to create a big decoration. I still wanted to know the character of this fondant. So I created carrot mini decor for my carrot cake. Before that I prepared myself by browsing through the internet about fondant (click here for tips and tricks) plus studying with Mbak Luluk *thanks Mbak :)* and asked questions to a cooking teacher at the Bogasari Baking Center.
When Pinot took his time off, I had a big spirit to work on fondant because he could take care of Arwen. On that day, I had prepared for the decoration theme. The most easiest inspiration ... no other than my own child :) It's an imaginary idea, Arwen was sleeping with the rainbow on the clouds.
The result was still far from perfect, but at least it paid my curiosity.
And as a beginner, I would like to share my experience (I'm not an expert, but this is the lesson that I've learned after playing around with fondant). Sorry that no recipe for today. The cake was just a blueberry sponge cake. Here are few tips and conclusion of my experience:
1. Upon buying the fondant, keep it in a closed container and put the container in room temperature or with air conditioner. If it's not closed the fondant will be getting hard and keeping it in fridge will melt the fondant.
2. Determine the theme for the cake a few days before preparing the cake or decorating the cake. This is important to get the process more focused. Lots of idea can be found in everyday living, for example, kitchen theme, afternoon tea, children are playing in the yard, flowers, plants etc. Or even the imaginative ones... be wild in looking for ideas. It's even great if you have access to the internet. Don't be lazy to browse and find ideas in Google.
3. One day before cake preparation, divide the fondant and give colours to it based on theme structure that we're going to use. Wrap the un-used fondant in a tight bag/container (I wrapped them in multipurpose cling film and put it in zipper bag). Create decoration items that you're going to use such as flowers, figure of people, trees etc, on that day. So that on the final day, we will only cover the cake and put those decoration items. This is important so that we're not going into rush at the kitchen to prepare the cake as well as concentrating to create the fondant...unless you're the type of person that could do multi-tasking.. hehehe.. I'm not that person and I have to concentrate to each task :) Besides, few shapes like flowers and ribbon are going to be perfect after set aside for a day.
4. One thing to note: fondant coloring is the same as icing coloring. The longer the time to color, it will change into more dark color. So don't be in a rush to put the color.
5. You don't need so many tools for the basic. Just prepare a rolling pin. For the rest of the tools, just use tools that you have around the house, for example glaze, cookies molding, small cutter etc. Be creative with things around us. I used tools that were used to mold the clay and paperclay, which luckily I had..hehehe.. but after a totally complete cleaning.
6. Always prepare a bowl of water and separate bowl of corn starch. This is another weapon that we need. Basically, when the fondant is getting hard and cold, sprinkle little bit of water or when the fondant starts to melt and feels sticky on your hand, use the corn starch.
7. Spread the corn starch on the table and rolling pin.
8. Don't leave the fondant with your kids. Otherwise they will destroy your work...hwahaha...that was close! I was almost done creating the character of Arwen, when she started rolling the pin into the fondant..
9. Last...I don't want to create cake decoration using the fondant if it's meant for my own. I couldn't eat it. It's such a cool thing. hahahaha...
Don't be afraid to try.. it was really fun!
Wah selamat selamat !
ReplyDeleteakhirnya berhasil jg merawanin si fondant. Gimana gimana asik kan ? kikikiki. For me, it's more than multiple orgasme kekekekeke.
Btw salut buangaet, empat jempols! Utk karya perdana, ini betul2 luar biasa. dah bsia bikin miniatur arwen ! waksss aku aja baru ke 5 atau 6 getu bikin orang. Eh dirimu bisa paperclay ya ? Ajarin donggggg !!!!
Keep bakin, keep exercising
to mbak Luluk : gileeee!!! gue disatronin sama ratu fondant...ihik jadi tersandung eh tersanjung! Makasih mbak, ditunggu input-input dan inspirasi berikutnya.
ReplyDeletembak, daku gak bisa paperclay, belajar ndiri aja. Kenalnya sama tanah liat duluan. Makanya alat2nya bekas ngerjain tanah liat...hehehe...
ditaaa....!!! hebat euy! itu fondant udah bertekuk lutut gitu... hihihi... :)
ReplyDeleteto Leili-mamaZaza : itu mah bukan fondant-nya yg bertekuk lutut, tapi modelnya, si Arwen, yang nekukin lutut bobok2an di atas awan ;P...kalo mo tau cerita dibalik itu, nonton di blognya Arwen deh :)
ReplyDeleteWoww..fondantnya kerenn, mau dong diajarin..hehe..thx ya Mba..Btw, mo tanya, gimana sih caranya bikin link dari kata2 di dlm postingan kita? Misal, "..sampe gue ketemu blognya Mba Luluk...", nah kalo Luluk-nya diklik kan langsung ngelink ke blog Mba Luluk. Caranya gimana ya? Hehe maklum blogger pemula..makasi ya Mba.
ReplyDelete