Showing posts with label dessert. Show all posts

6.03.2015

Dominique Ansel Kitchen

IMG_9388


Waktu Adith e-mail saya untuk minta bantuan motretin Dominique Ansel untuk artikel dia di majalah The Foodie Magazine, gak pake mikir panjang, langsung saya iyain. Padahal deg-degan banget....hahahaha! Pertama udah lumayan lama saya gak motret karena urusan pindah-pindahan dari Kuwait-Indo-NYC. Kedua, INI DOMINIQUE ANSEL!!!! Chef handal sang pencipta cronut itu! Deg-degan campur happy. Karena baru 3 bulan di NYC, udah diajak motret yang food related. Terakhir megang kamera ya pas ngadain workshop di Jakarta dan Bandung itu.

IMG_9520chef Dom

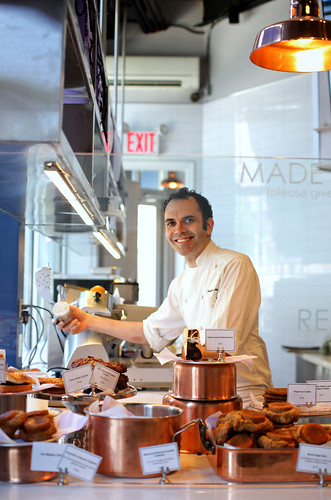
Lokasi motretnya di Dominique Ansel Kitchen di daerah West Village. Sampe sana kami disuguhi dessert-dessert andalannya, yang tentu saja jadi bahan pemotretan. Tapi sayang, di sini mereka gak jual cronut. Padahal saya penasaran pengen coba. Karena cronut cuman dijual di Dominique Ansel Bakery, yang itu pun untuk membelinya musti antri dari jam 6 pagi. Makasihhhh banyakkkkk!

IMG_9490

Tapi saya gak kecewa, karena di sini saya bisa menikmati Lemon Yuzu Butter Tart-nya, yang OMG!!!! Enak banget! Asem-asem silky gitu rasa fillingnya.

Sementara Adith wawancara sang chef, saya sibuk mengabadikan momen itu. Setelah itu dilanjutkan dengan motret dessert-dessert yang disajikan.

More photos ada di flickr kami, di sini.

Liputannya sudah tayang di The Foodie Magazine edisi Juni 2015.

12.18.2011

Poffertjes

poffertjes

I have two recipes of Poffertjes that I always use. The first one is quite easy and simple. No mixer, no instant yeast and no buckwheat flour needed. See the recipe here.

The other one is a bit complicated, but the result is great. I blogged about it in 2010, now let me re-write the recipe in English.

poffertjespoffertjes

Poffertjes (Indonesian Version)
Source : Primarasa Femina, slightly modified by me

Ingredients:
250 gr of all purpose flour
75 gr sugar
1/2 teaspoon instant yeast
3 eggs
400 ml milk (I used 100 ml evaporated milk + 300 ml of milk)
50 g butter, melted
1/4 tsp salt
50 gr cheddar cheese, diced
powdered sugar for sprinkling

Method :
1. Mix flour, sugar and instant yeast in a bowl. Set aside.
2. Warm the milk (do not boil). Beat the egg. Pour the warm milk and stir well.
3. Pour the milk+egg mixture into a bowl of flour. Stir until smooth.
4. Add the melted butter and salt. Stir well.
5. Rest the dough for 15-30 minutes.
6. Melt butter in a poffertjes pan. When it sizzles, pour batter into each hole of the pan and filling them about 3/4s of the way full. Wait until the surface perforated. Then put cheese cube. Turn the halfcooked poffertjes into the other poffertjes so it will look like a mini sandwich. And when one bottom has set, flip over the poffertjes sandwich. Wait a minute until the other side is golden.
7. Place on a serving plate, sprinkle with powdered sugar. Serve.

4.11.2011

(Baking with Kids) Snickers Brownies

Oalah, tante Lala tetangga sebelah, ngasih segepok snickers dan kawan-kawan. Gaswat, musti diumpet-umpetin nih. Kalo krucils sampe tau, bisa gak brenti-brenti makan dan efeknya...DASYAT! Saya ulangi DASYAT! Efek sampingnya ke mereka adalah jadi gak bisa diem, pecicilan, jadi aktif banget dan ketawa-ketawa gak jelas. Persis kayak orang mabok...tapi ini mabok sweets...LOL.

Baking with kids : Snickers Brownies

Nah, daripada daripada, mending ini snickers diberdayakan aja. Yang kepikiran langsung bikin brownies. Pas masih punya LINDT nganggur juga. Tadinya pengen pake resep brownies biasanya, tapi pengen coba eksperimen resep lain. Akhirnya pilih resepnya TASTE. Sengaja pilih yang gampang gak pake mikser karena mau dikerjain bareng Arwen dan Leia.

Snickers Brownies
source : TASTE

Ingredients :
150g butter, chopped
200g dark chocolate, chopped
3/4 cup caster sugar
2 eggs, lightly beaten
1 cup plain flour, sifted
1/4 cup self-raising flour, sifted
2 x 60g Snickers chocolate bars, cut into 1cm cubes

Method :
Grease a 3cm-deep, 18cm x 28cm (base) slice pan. Line with baking paper, allowing a 2cm overhang at long ends.

Place butter, dark chocolate and sugar in a saucepan over medium heat. Cook, stirring occasionally, for 3 to 5 minutes or until chocolate has melted. Set aside for 15 minutes to cool. Preheat oven to 180°C/160°C fan-forced.

The Making of Snickers Brownies

Whisk eggs and then flours into chocolate mixture. Fold in Snickers. Pour mixture into prepared pan. Smooth top. Bake for 25 minutes or until a skewer inserted in the centre comes out with crumbs clinging. Cool in pan. Serve.

Picnik collage


The Making of Snickers Brownies

The Making of Snickers Brownies

The Making of Snickers Brownies

Notes
Variation: You could use 2 x 80g Cherry Ripe chocolate bars instead of Snickers.


The Making of Snickers Brownies

Saya masih lebih suka tekstur brownies yang biasa saya buat. Ini lebih kayak cake dan sedikit chewy karena efek snickers-nya. Next kalo bikin lagi, mau pake resep biasanya aja.

Baking with kids : Snickers Brownies


3.31.2011

Cherry Drop Chocolate Mint Brownies

Brownies ini andalan banget. Waktu baru pertama kali bikin untuk camilan manis di ulangtahun Arwen, banyak banget yang suka. Sampe-sampe ada yang request minta dibikinin abis itu. Akhirnya saya beberapa kali bikin pesenan temen-temen.

Morning coffee

Makasih ya jeng R buat resepnya. Suka banget deh. Daripada lupa-lupa terus, resepnya saya copas simpen sini ya.

Untuk fillingnya, selain manisan cherry, kadang saya kombinasi dengan kacang-kacangan. Buat saya resep ini agak kemanisan, makanya gulanya sering saya kurangin jadi cuman 280gr dan gak pake chocolate chips biar gak kemanisan.

CHERRY DROP BROWNIES
modified by Rachmah Setyawati
source : Buku BROWNIES by Ambarini

Bahan :
200 gr Mentega tawar
200 gr DCC ---- (Rachmah pakai semuanya dgn Lindt Chocolate rasa Mint), lelehkan kedua bahan diatas, sisihkan.
4 butir ayam utuh
sedikit vanilli ekstrak
320 gr Gula Pasir Agak Halus (Gula pasir biasa diblender sebentar)
160 gr Tepung Terigu
15 gr Susu Bubuk
50 gr Chocolate Bubuk

satu genggam choco chips rasa mint
beberapa buah manisan cherry merah

Cara membuat :
1. Kocok telur + gula pasir+vanili ekstrak, hingga gula larut mengembang (jangan terlalu kental sekali),
2. masukkan mentega dan coklat cair, kocok dgn speed rendah asal tercampur rata aja,
3. setelah itu masukkan bahan kering (tepung, susu dan coklat bubuk diayak). Aduk merata,
4. masukkan choco chips, aduk lagi.
5. Panaskan oven sekitar 160derajat celcius , masukkan adonan ke dalam paper cup cakes, tuang 3/4 penuh, masing-masing cup cakes beri satu buah manisan cherry merah tanpa tangkai. Atau pakai loyang brownies ukuran 10X26X4cm = 2bh atau bisa masuk ke dlm loyang uk. 24X24X4cm. Panggang hingga brownies matang.


12.18.2010

Homemade Ferrero Rocher

Homemade Ferrero Rocher

Sejak bikin green tea truffles, saya jadi ketagihan bikin jenis truffles yang lain. Waktu ke supermarket liat ferrero rocher langsung kepikiran untuk bikin sendiri. Setelah googling, saya lihat yang kira-kira rasanya hampir mendekati kayaknya resepnya si Ellie Almost Bourdain. Iseng-iseng nge-twit, eh Arfi juga mau ikutan bikin dan ternyata Pepy juga bikin. Ayo siapa lagi mau ikutan?

Setelah saya hitung-hitung ternyata resep Ellie agak boros Nutella, akhirnya saya memutuskan bikin pake ganache coklat hazelnut aja. Coklatnya saya pakai Hazelnut Chocolate dari LINDT.

Wiihhh ternyata bener dugaan saya, walopun bentuknya gak persis sama dengan ferrero rocher tapi rasanya gak kalah deh. Dengan biaya yang ekonomis, saya bisa bikin ferrero rocher KW 1 :D.

Homemade Ferrero Rocher
inspirasi : Ellie Almost Bourdain

Bahan-bahan :
450 g hazelnut wafer biscuits, hancurkan
400gr Lindt Hazelnut Chocolate, yang di dalamnya sudah terkandung butiran kacang hazelnut
1/2 cup whipped cream (whc)
200gr dark chocolate + 100gr milk chocolate (untuk coating)

Cara membuat :
1. Taruh wafer yang sudah hancur dalam wadah, sisihkan.
2. Panaskan 1/2 cup whc, setelah mendidih tuang ke dalam potongan-potongan hazelnut chocolate. Aduk hingga cair semuanya.
3. Tuang coklat cair tadi ke dalam wadah yang berisi wafer. Aduk-aduk hingga rata dan seluruh wafer terbalut coklat.

Step by Step : Homemade Ferrero Rocher

4. Pulungi membentuk bola-bola coklat. Kemudian dinginkan dalam kulkas hingga set.

Homemade Ferrero Rocher

5. (Coating) Cairkan coklat pada double boiler. Angkat.
6. Gulingkan bola-bola coklat pada coklat cair. Biarkan kaku di dalam kulkas.

Homemade Fererro Rocher

7. Kemudian susun di wadah-wadah kertas.

4.12.2010

Tiramisu Cheesecake

Sebenernya cake ini aslinya pake Mascarpone Cheese yang merupakan ciri khas tiramisu. Tapi berhubung gak ada mascarpone, gue substitute dengan cream cheese. Untuk frostingnya gue juga pake resep sendiri, krim kental dikocok sampe mengembang terus campur dengan cream cheese dan sedikit butter plus gula icing. Sengaja gue cetak jadi cupcake supaya enak makannya. Buat yang punya anak-anak, sirup kopi bisa diganti dengan coklat (pake coklat bubuk, caranya sama dengan bikin sirup kopi)

Step-nya sih keliatannya aja panjang, tapi sebenernya nggak kok. Rasanya? Recommended banget!

Tiramisu cheesecake


Makasih ya mama Pindi aka Findrie K. Irawan. TFS!

Tiramisu Cupcake
(in Bahasa Indonesia)
source : Mama Pindi's Kitchen

I. Mascarpone Cheese Cake

Bahan:
(campur dan ayak)
50 gr tepung terigu
50 gr tepung maizena
Bahan:
60 gr mentega tawar
250 gr Mascarpone cheese, biarkan pada suhu ruang
120 ml whip cream
5 kuning telur
5 putih telur
1/8 sdt garam
125 gr gula pasir halus
1 batang Vanilla, srapped ambil bagian dalamnya

Caranya:
Siapkan loyang cupcake, Pasang oven 150 derajat Celsius, masukkan alas loyang yang diisi air panas.

Campur mentega, Mascarpone cheese, whip cream, vanilla pod & batangnya dalam wadah.
Didihkan dengan api kecil, aduk hingga lembut, angkat dari api (diamkan sampai uapnya hilang).

Masukkan campuran tepung, aduk rata. Masukkan kuning telur aduk rata. Buang batang Vanilla. Sisihkan.

Kocok putih telur hingga berbusa, masukkan gula sedikit demi sedikit sambil terus dikocok sampai terbentuk kerucut-kerucut tumpul (soft peak).

Tuang 1/3 adonan putih telur ke adonan mascarpone cheese, aduk rata. Tuang campuran ini ke sisa adonan putih telur, aduk rata.

Tuang adonan ke loyang, panggang dengan cara au bain marie, kurang lebih 20-30 menit sampai permukaan matang, kuning keemasan. Keluarkan dari oven. (Cara test kue sudah matang atau belum, tusuk dengan tusuk gigi, bila adonan lengket di tusuk gigi maka kue belum sepenuhnya matang, bila sudah tidak ada yg lengket, tandanya kue sudah matang secara menyeluruh).

Setelah benar-benar dingin, lepaskan cake dari loyang, taruh di atas rak kawat hingga dingin.

II. Coffee Syrup
1 sachet bubuk kopi instan, seduh air hangat (pilih yang bau kopi-nya strong)
2 sdm Rhum (optional)
2 sdm Kahlua (optional

III. Mascarpone Frosting
1 cup heavy cream
8 ounces mascarpone cheese, room temperature
1/2 cup gula halus
Kocok cream dengan mixer hingga mengembang dan stiff peak (kaku). Di wadah lainnya, kocok mascarpone dan gula hingga halus. Kemudian campur whipped cream kedalam mascarpone hingga rata.

Tiramisu cheesecake

IV. Penyelesaian
Bila cup cake sudah dingin, berikan beberapa sendok cairan Kopi hingga cake terlihat coklat. Jangan ragu untuk memberikan kopi yang banyak hingga meresap ke dalam kue, karena ini yang akan membuat rasanya beda. Masukkan mascarpone frosting ke dalam plastik segitiga dan gunakan tip yang diinginkan lalu semprotkan ke atas masing-masing cupcake hingga habis. Taburi coklat bubuk, lalu hias dengan coklat serut. Tambahkan buah dan daun mint sebagai pemanis.

7.14.2009

CLICK July 2009 : BI-COLOUR : Turkish Delight


Bee and Jai, this is my entry for Click : Bi-Colour

IMG_3484.jpg
Camera : Canon EOS 500D
Lens : 50 mm f/1.4
Natural lighting


If you are interested, please join the fun here.

Here's another shot

Turkish Delight

7.01.2009

Strawberry Yoghurt Ice Cream

Summer treat!!!! Fiiuuhhh....It's really hot in here (45˚C), we need something fresh. Simple yet refreshing. You don't need to think to make this dessert :)....easy peasy! And the most important thing, my kids like it.

Strawberry Yoghurt Ice Cream

Strawberry Yoghurt Ice Cream
(No Ice Cream Maker needed)

Ingredients :
Fresh Strawberries
1 cup yoghurt
1 cup whipping cream
sugar

Directions :
Put all the ingredients on Food Processor and process until smooth. Cool in the refrigeratorfor 2 hours. Taarraaaaa and enjoy your treat.

Strawberry Yoghurt Ice Cream Collage

6.05.2009

Classic Sour Cherry Pie with Lattice Crust

I love this recipe! No egg needed, so the texture will be more like puff pastry. Light and flaky crust with incredible sour cherry filling....YYUUUMMM!!!

Cherry Pie

Classic Sour Cherry Pie with Lattice Crust
adapted from : Bon Appétit Magazine June 2008

Ingredients :
CRUST

* 2 1/2 cups unbleached all purpose flour
* 1 tablespoon sugar
* 3/4 teaspoon salt
* 1 cup (2 sticks) chilled unsalted butter, cut into 1/2-inch cubes
* 5 tablespoons (or more) ice water

FILLING

* 1 cup plus 1 tablespoon sugar
* 3 tablespoons cornstarch
* 1/4 teaspoon salt
* 5 cups whole pitted sour cherries or dark sweet cherries (about 2 pounds whole unpitted cherries)
* 1 teaspoon fresh lemon juice (if using sour cherries) or 3 tablespoons fresh lemon juice (if using dark sweet cherries)
* 1/2 teaspoon vanilla extract
* 2 tablespoons (1/4 stick) unsalted butter, cut into 1/2-inch cubes
* 1 tablespoon (about) milk
* Vanilla ice cream


(Tips : Since I don't have cherry pitter, I used a Chopstick to push the pit through the fruit)

Manual Cherry Pitter

Directions :
CRUST

Whisk flour, sugar, and salt in large bowl to blend. Add butter and rub in with fingertips until small pea-size clumps form. Add 5 tablespoons ice water; mix lightly with fork until dough holds together when small pieces are pressed between fingertips, adding more water by teaspoonfuls if dough is dry. Gather dough together; divide into 2 pieces. Form each piece into ball, then flatten into disk and wrap in plastic. Refrigerate at least 30 minutes. DO AHEAD Can be made 2 days ahead. Keep chilled. Let dough soften slightly before rolling out.

FILLING :

1.Position rack in lower third of oven and preheat to 425°F. Whisk 1 cup sugar, cornstarch, and salt in medium bowl to blend. Stir in cherries, lemon juice, and vanilla; set aside.

2. Roll out 1 dough disk on floured surface to 12-inch round. Transfer to 9-inch glass pie dish. Trim dough overhang to 1/2 inch. Roll out second dough disk on floured surface to 12-inch round. Using large knife or pastry wheel with fluted edge, cut ten 3/4-inch-wide strips from dough round. Transfer filling to dough-lined dish, mounding slightly in center. Dot with butter. Arrange dough strips atop filling, forming lattice; trim dough strip overhang to 1/2 inch. Fold bottom crust up over ends of strips and crimp edges to seal. Brush lattice crust (not edges) with milk. Sprinkle lattice with remaining 1 tablespoon sugar.

Cherry Pie Fresh from the Oven

3. Place pie on rimmed baking sheet and bake 15 minutes. Reduce oven temperature to 375°F. Bake pie until filling is bubbling and crust is golden brown, covering edges with foil collar if browning too quickly, about 1 hour longer. Transfer pie to rack and cool completely. Cut into wedges and serve with vanilla ice cream.

Cherry Pie Collage

Another Pie recipes ;
1. Banofee Pies
2. Apple Tart

5.27.2009

(Faux) Canelés

When a friend of mine mentioned about this French tiny cake, I got very excited. I really wanted to taste it. Since she didn't have the recipe, so I googling around and found tons of recipes. I decided to use Clotilde's recipe. And quite surprised that the ingredients are so easy to find in your kitchen.

Actually, Canelés is French Rum and Vanilla Cake. Since I don't have the mold, I just used the mini muffin tin *oopsss*....that's why I call it Faux ;)(find here for the real Canelés). Nearly black at first sight, bittersweet at first bite, the crunchy burnt sugar canelé-shell makes an exquisite complement to its smooth, sweet filling, fragrant with vanilla and rum.

Faux Canelés

Canelés
adapted from : Chocolate and Zucchini

Ingredients :
- 1/2 liter (2 cups) milk
- 30 g (3 tablespoons) salted butter, diced
- 1 vanilla pod, split, or 1 teaspoon vanilla extract or paste
- 100 g (3/4 cup) all-purpose flour
- 180 g (1 cup minus 2 tablespoons) sugar
- 3 eggs
- 80 ml (1/3 cup) good-quality rum

Yields about 20 medium canelés.

Faux Canelés

Directions :
Combine the milk, butter and vanilla in a medium saucepan, and bring to a simmer. In the meantime, combine the flour and sugar in a medium mixing-bowl. Break the eggs in another, smaller bowl, and beat gently. When the milk mixture starts to simmer, remove from heat, fish out the vanilla pod if using, and set it aside.

Pour the eggs all at once into the flour mixture (don't stir yet), pour in the milk mixture, and whisk until well combined and a little frothy. Scrape the seeds from the vanilla pod with the dull side of a knife blade, and return the seeds and pod to the mixture. Add the rum and whisk well. Let cool to room temperature on the counter, then cover and refrigerate for at least 24 hours and up to 3 days.

The next day (or the day after that, or the day after that), preheat the oven to 250° C (480° F). Butter the canelé molds if they are made of copper (unnecessary if you're using silicon molds). Remove the batter from the fridge: it will have separated a bit, so whisk until well blended again. Pour into the prepared molds, filling them almost to the top. Put into the oven to bake for 20 minutes, then (without opening the oven door) lower the heat to 200° C (400° F) and bake for another 40 to 60 minutes (depending on your oven and how you like your canelés). The canelés are ready when the bottoms are a very dark brown, but not burnt. If you feel they are darkening too fast, cover the molds with a piece of parchment paper.

Unmold onto a cooling rack (wait for about ten minutes first if you're using silicon molds or they will collapse a little) and let cool completely before eating.

5.16.2009

Poffertjes

Poffertjes or Dutch Pancakes or Tiny Pancakes are usually served with melted butter and sieved powdered sugar. But strawberry and cream, caramel sauce, chocolate sauce, etc will do. It's all up to your mood :).

Poffertjes

Actually, they are not kinda hard to prepare but a special pan is needed. This is a special cast-iron or copper pan also available in aluminium with teflon-coating with several shallow indentations in the bottom. And I want it so bad!!


Poffertjes

And guess what??....Yayyy...got this beautiful, cast-iron Poffertjes pan from Titan Baking when I had a trip last month to my homecountry, Indonesia. I fell in love in the first sight and couldn't help myself not to grabbed it! Eventhough it's quite heavy and would make my luggage screaming out loud...LOL! Actually this cast-iron pan is multifunction. I can make mini Mud Cake, Bika Ambon, Kue cubit, etc with that pan.

This recipe is quite easy and simple. No mixer, no instant yeast and no buckwheat flour needed. And better eat warm. Perfect for lazy Sunday brunch!

POFFERTJES
source : Gel's Kitchen

Poffertjes

Preparation Time: 10 mins
Standing Time: 60 mins
Cooking Time: 30 mins

Ingredients :
500g self-raising flour
2 large eggs
800ml milk
1 tsp vanilla extract
(dita - I added 1/2 cup sugar)
a pinch of salt
olive oil for brushing the pan

Method :
Sift flour in a large bowl. Combine milk, eggs and vanilla extract in a bowl and mix lightly. Add the wet mixture to the flour and beat well for 3-5 minutes till the batter is light and fluffy. Cover and stand batter for an hour.

Pour batter into a squeeze bottle [like the ones you get in the supermarket for sauce]. Place Poffertjes pan on the cooktop at medium heat. Brush pan with a liberal dose of olive oil. When the oil is hot, squeeze the batter into each hole, filling it just below the rim. When bubbles start appearing in the batter, flip over each pancake gently in their holes with a butter knife. Cook this side for 2-3 minutes and slide the pancakes onto a plate.

(makes 90-95)

Serving suggestions :
# Serve hot with strawberries, fresh cream, nuts and chocolate sauce.
# These pancakes can also be served simply with a drizzling of coarse sugar, topped with freshly squeezed lemon juice.

Poffertjes collage

2.22.2009

Yogurt Panna Cotta with Strawberry Compote

This simple dessert is wonderfully tangy. I love the sour sensation, mixed with the delicate texture of it.

Yogurt Panna Cotta with Strawberry Compote

Yogurt Panna Cotta with Strawberry Compote
adapted from: btn's Kitchen

Ingredients (for two portions):
200 ml heavy cream (dita - I used 1/2 milk-1/2 whipped cream)
2 teaspoons vanilla extract
3 tablespoons sugar
7 g gelatin + 4 tablespoons cold water for dissolving it.
150 g yogurt

Directions:

1. Dissolve gelatin in cold water.
2. In a saucepan on medium heat mix cream, vanilla and sugar, stirring continuously until sugar melts.
3. Add gelatin and stir until it dissolves.
4. In a separate bowl stir the yogurt to get rid of any lumps.
5. Slowly pour the hot cream mix into the yogurt, whisking constantly.
6. Pour mix into two glass bowls or ramekins or whatever suitable bowls you have.
7. Refrigerate for about 4 hours or until firm.

To serve:

Flip onto chilled plate, and garnish with warm raspberry preserves, or cranberry sauce or fresh fruit or any combination of those.

Strawberry Compote

Ingredients :
1 cup Fresh Strawberry, sliced
Sugar to taste
Lemon juice
Wine/Rhum (optional)

Directions :
Mix all the ingredients until sugar dissolved. Bring to a boil. Remove from heat. Chilled.

Tips :
To invert panna cotta, set the ramekins into a pan of hot water for 15 seconds. Make sure the water does not get into the ramekins. Run a knife around the edges of ramekins and invert them onto plates. Remove the ramekins. Top panna cotta with strawberry compote.

10.13.2008

ITB : Fruits and Nuts - Carrot Pineapple Walnut Upside-Down Cake

Fruit and veggie based cakes are always my favorite. Especially the ones with a touch of spices such as cinnamon, clove and nutmeg.

When I saw this recipe at Vania's, I raised my eyebrows. Pineapple and carrot? Sounds weird. But I was really curious because Vania said, "enak banget!" (means "so delicious!") *I always rely on your taste bud, dear :D*.

Carrot Pineapple Upside Down Cake

And yes indeed! This cake was so delectable. I love it and I assume an addition of ground cinnamon would make it perfect.

I want to bring this cake to In The Bag-September : Fruits and Nuts hosted by my dear friend, Scott of realepicurean. But ohh la la...I just realized that I'm late :( *kamana wae neng?*, I forgot the deadline date is Oct 5th. Then I told Scott that I'm sorry I cannot participate on this event. But he still counting me in and asked me to submit my entry *thanks Scott, how generous you are ;)*

Carrot Pineapple Upside Down Cake

Carrot Pineapple Upside-down Cake
Source: Better Homes and Gardens India, April 2008 (copied from Vania's)
prep: 30 min, bake 45 min, cook 35 min.

Ingredients :
1/3 cup packed brown sugar
2 tbsp butter
1 tbsp water
6-8 1/2 inch thick slices fresh pineapple, cored and halved
2 cups all purpose flour
1 tbsp baking powder
1/2 tsp salt
1/tsp ground nutmeg
1/2 cup butter, softened
1 cup granulated sugar (dita - I used light brown sugar)
2 eggs
1 tsp vanilla
3/4 cup milk
3 carrots, finely shredded (1 1/2 cups)
(dita - I added 1/2 cup walnut)

Directions :
1. Preheat Oven to 350F. Lightly coat a 9x9x2 inch baking pan with non-stick cooking spray or oil; set aside.
2. In a small sauce pan, combine brown sugar, 2 tbsp butter, and water. Cook and stir over medium heat until mixture comes to boiling and is smooth. Pour in prepared pan; tilt to evenly coat bottom. Arrange pineapple slices over top.
3. In a medium bowl, combine flour, baking powder, salt and nutmeg; set aside.
4. In a large mixing bowl, beat 1/2 cup butter on medium-high for 30 seconds. Gradually add granulated sugar, beating until combined; beat 2 minutes more. Add eggs, one at a time, beating well after each addition. Beat in vanilla. Alternally add flour mixture and 3/4 cup milk; beat on low after each just until combined. Stir in carrots. Add walnut (dita). Spread batter over pineapple.
5. Bake 45 minutes or until golden and wooden pick inserted in centre comes our clean. Cool in pan on the rack for 5 minutes. Invert on platter. Cool 30 minutes.

Flower

9.27.2008

[Indonesian Traditional Food] Ketan Sarikayo - Steamed Glutinous Rice and Coconut Milk Custard

I made this Padangnese/Minangnese (also known as Minangkabau, is indigenous to the highlands of West Sumatra, in Indonesia) style as our break-fast dish. They call it Sarikayo, some people may call it Srikaya and Sarikaya. But it never come into questions, in fact it enriches the culinary world of Indonesia.

Perhaps, not many of you knowing that Indonesia has various kind of foods. Not just the iconic dish beef rendang (which come from Padang/Minang), gudeg (young jackfruit in coconut milk, from Central Java), satay ayam (from Madura) or mie goreng Jawa (javanese style fried noodle), etc. In Indonesia you can find tons of traditional recipes that comes from each ethnic groups inherited in generations. They are usually rich in ingredients and full of spices.

Sarikaya itself is varied in Indonesia. You will find Sarikaya in green color with pandan extract in Palembang, Sarikaya pudding without steamed glutinous rice in Makassar and Sarikaya mold in the baking dish with steamed glutinous rice in Java.

To honour my home country Indonesia, I'd like to introduce this dish to the world through Waiter There's Something in....Indonesian hosted by Andrew of Spittoon Extra.


Ketan Sarikayo - Steamed Glutinous Rice and Coconut Milk Custard
adapted from : Uni Dewi Anwar's Family Recipe

Sarikayo (Coconut Milk Custard)


Ingredients :
* 1 cup egg (dita-I used 3 eggs)
* 1 cup dark brown sugar/coconut sugar/palm sugar, shredded
* 1 cup thick coconut milk
* 1/2 tsp salt
* 1/2 tsp vanilla
* 2 pandan leaves, knotted
* 1 tbsp ginger water (dita-I used 2 tbs)

Directions :
1. Mix sugar and coconut milk, stir until sugar dissolves, strain. Set aside.
2. Beat loosely the eggs. Pour in the coconut milk-sugar mixture. Stir well. Add ginger water, vanilla and pandan leaves.
3. Pour in the baking dish. Steam for about 30 minutes. Remove from heat. Cool and serve.

Ketan/Steamed Glutinous Rice

Ingredients :
300 gr glutinous rice/sweet rice, soaked for 1 hour, drained
1/2 tsp salt + 1 pandan leaf
150 ml coconut milk

Directions :
1. Steam rice until half-cooked. Remove from steamer. Set aside.
2. Mix coconut milk, salt and pandan leaf, stir well, bring to a boil. Remove from heat.
3. Add coconut milk to the half-cooked rice. Stir until absorbed.
4. Put the rice back on the steamer. Steam for 30 minutes.
5. Cool and serve with Sarikaya.


The soft texture of Sarikayo blends with the ginger aroma, serves with steamed glutinous rice is really a sweet indulgence in the afternoon.

Another Indonesian Food Recipes from my kitchen :
1. Klepon - Sweet Rice Balls Stuffed with Palm Sugar
2. Biji Salak - Sweet Potato Balls in Palm Sugar Syrup
3. Bubur Kacang Ijo - Mung Beans Porridge with Pumpkin Puree
4. Nasi Langgi
5. Kering Kentang - Spicy and Crispy Potato
6. Tongseng
7. Mie Bakso Iga
8. Wedang Ronde - Ginger Ronde Drink
9. Roti Gambang - Indonesian Traditional Bread
10. Gohu - Unripe Papaya in Sweet, Sour and Spicy Syrup
11. Ketan Serundeng - Sticky Rice Balls with Spicy Grated Coconut
12. Gemblong - Deep Fried Sticky Rice Coated with Caramel

9.20.2008

[Indonesian Traditional Food] Wedang Ronde - Ginger Ronde Drink

A popular dish from Java Island.

And here's my entry for FOOD PHOTOGRAHY competition to celebrate the 1st anniversary of Klub Berani Baking (Indonesian Baking Club).


[Indonesian Food] Wedang Ronde - Ginger Ronde Drink

Wedang Ronde (Ginger Ronde Drink)
Adapted from Yasa Boga

[Indonesian Food] Wedang Ronde - Ginger Ronde Drink

Ingredients:
Dumplings :
• 150 grams glutinous rice flour
• 2 teasoons sago flour (dita-I used tapioca flour)
• salt, according to taste
• 25 cc betel lime liquid/air kapur sirih (??) (dita-I skipped)
• 50 cc warm water
• food dye, according to preference

Filling :
• 50 grams peanuts, dry-fried, peeled and pounded coarsely with 2 tablespoons granulated sugar

Ginger Syrup :
• 1 litre water
• 2 ½ tablespoons ginger, minced
• 3 stalks lemon grass, cut into 3 pieces each and bruised
• 2 pandan leaves, knotted
• 200 grams granulated sugar (dita-I used palm sugar)

[Indonesian Food] Wedang Ronde - Ginger Ronde Drink

Directions :
Dumplings : mix glutinous rice flour, sago flour and salt. Add betel lime liquid and warm water a little at a time, kneading until the dough can be shaped. Divide into 2-3 parts, each dyed a different colour.
• Make balls as big as quail’s eggs, flatten and place filling in the centre. Close up the dough and reshape into balls.
• Cook balls in the boiling water until they float and are done. Drain.
• Put Ronde balls in ginger syrup and serve.

Ginger Syrup : boil water and ingredients in covered saucepan on low heat for 30 minutes until the aroma is quite strong. Sieve.

9.19.2008

[Indonesian Traditional Food] Biji Salak - Sweet Potato Balls in Palm Sugar Syrup

Making this brings my childhood memories. My mom used to make this dessert during ramadhan. Actually you can get this popular break-fast dish from the street vendor but we always prefer the homemade ones :).

Biji Salak - Sweet Potato Balls in Palm Sugar Syrup

After having some sips of warm sweet tea, this is definitely a luscious break-fast dish.

Biji Salak - Sweet Potato Balls in Palm Sugar Syrup
adapted from Dapurbunda

Ingredients :

500 g sweet potatoes
50 g tapioca flour
¼ tsp salt

Biji Salak - Sweet Potato Balls in Palm Sugar Syrup

Syrup :

250 g gula Jawa/palm sugar/brown sugar/coconut sugar, shredded
250 ml water
1 pandan (screwpine) leaf

Coconut Milk Sauce :
500 ml coconut milk
2 pandan (screwpine) leaves
¼ tsp salt

Directions :
1. Steamed sweet potatoes until done. Remove from heat. Peeled and mashed.
2. Take mashed sweet potatoes, mix with tapioca flour and salt, knead until smooth. Roll into small balls, about 1 cm in diameter, set aside. Sprinkle with flour to avoid sticking.
3. Bring water to a boil, and drop in the sweet potato balls, cook until they float. Drain and set aside.

Syrup
Directions :

Put the water, sugar, and pandan leaf in a saucepan and boil, strain and put back in the saucepan. Boil again. Add in the balls until they are all floating. Serve with coconut milk sauce.

Coconut Milk Sauce
Directions :
Cook coconut milk with salt and pandan leaves, stirring on low heat until the mixture boils. Remove from heat. Cool and serve.