10.24.2008

PennyLane's Chocolate Cookies

If you're looking for that Perfect chocolate cookies, you've certainly come to the right place. Did I say perfect?? Yes, with a capital P! No doubt.

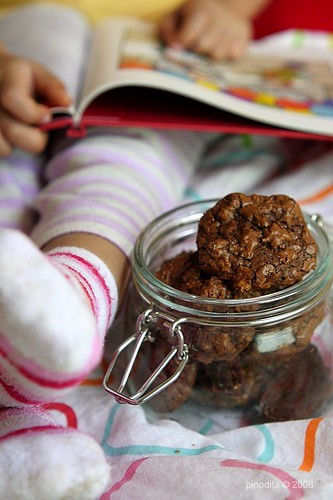
This is my kind of cookies. Crispy on the outside, fudgy on the inside with a hint of white chocolate chips (please please don't omit this item. I know...I know...for some people including me, white chocolate is not a chocolate but this time it's exceptional. It's there to strengthen the taste of the dark chocolate) mixed with nuts and chocolate chips.

Pennylane's Chocolate Cookies

Nuff said, I lost word and my mouth is full. I couldn't stop nibbling on all of these cookies *now I become a cookie monster*. I don't even care about my waistline and my digital scale. Sorry Arwen and Leia, you have to share them with mommy :D

To my dearest friend, Mindy Jordan, you should put this recipe on the top of your baking list this week ;). Must try!

5 stars to this recipe! Thanks for sharing the recipe, mbak Riana. Damn girl, you're so genius! This is the best chocolate cookies ever.

PennyLane’s Chocolate Cookies
Original source: Joy of Baking
Modified by: Riana

Pennylane's Chocolate Cookies

Ingredients :
60 grams cake flour (low protein flour) (dita-I used all purpose flour)
1 teaspoon baking powder
450 grams bittersweet or semisweet chocolate, coarsely chopped
60 grams unsalted butter or margarine
250 grams granulated white sugar
4 eggs, room temperature
1/4 teaspoon salt
4 gram instant coffee powder (2 sachet @ 2 grams), diluted with a few drops of hot water
1 tablespoon pure vanilla extract
175 grams semisweet dark chocolate chips
175 grams white chocolate chips
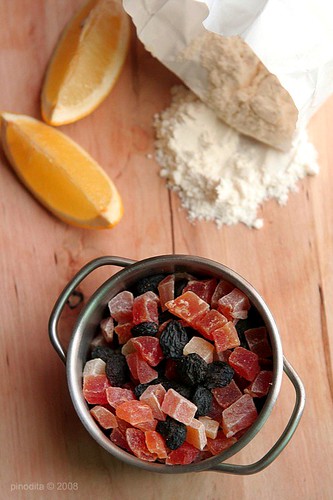
200 grams your favorite nuts, coarsely chopped and toasted (dita-I used walnut)

Directions :
1. Mix together the flour and baking powder. Set aside.
2. Melt the chocolate and butter/margarine in a stainless steel bowl placed over a saucepan of simmering water, stirring until smooth. Remove from heat and set aside.
3. In the bowl of your electric mixer (or with a hand mixer), beat the sugar, eggs and salt until pale yellow and thick, about 5 minutes. Beat in the melted chocolate mixture, coffee and vanilla extract. Sift the flour mixture above the batter and fold it in. Mix only until incorporated. Stir in the chocolate chips and nuts. Cover with plastic wrap and refrigerate the batter until firm, about 30-60 minutes.
4. Preheat oven to 170-180 degrees Celcius and place rack in center of oven. Line baking sheets with parchment paper or silicone baking mat.
5. Using ice cream scoop, small or medium –whatever you prefer, scoop and drop batter onto prepared cookie sheets, spacing evenly. With moist fingers, press batter a little bit.Bake cookies about 10 - 12 minutes or until the tops of the cookies become dry and cracked, but are still shiny. Do not overbake these cookies.
6. Remove from oven and place baking pan on a wire rack to cool. When cookies are firm, remove from baking pan and let completely cool on rack.

Pennylane's Chocolate Cookies

Note from Riana :
* The time you need to let the batter harden in the fridge could be varied, depending on the chocolate you use. One chocolate could make the batter thicker or runnier than the other one. Check every 30 minutes, just until the batter is easy to scoop and drop without spreading.
* When you found your batter is too hard to scoop, or the cookies are too flat, it means the batter is too cold to begin with. Let it stand at room temperature until it reaches right consistency, then continue baking. The cookies should not be too flat.

Pennylane's Chocolate Cookies

10.19.2008

SHF-Spice Up Your Life : Favourite Boiled Fruit Cake

I still remember very well when I was a kid, my grandma always made delicious fruit cake for Idul Fitri. But I never knew the recipe until now.

And a couple of weeks ago, my KBB friend, Lina, was asking the recipe of English Fruit Cake on the mailing list. Ine Sena recommended us the famous Rea's recipe. I was so curious and dared everybody in the klub to make this cake ;).

And ta raaaa I've made it.....Girls, you must try this recipe! Enjoy my fruit cake!! I love it. Thanks Rea. I just couldn't stop myself for a second bite ;). This one is as scrumptious as my grandma's.

English Fruit Cake

As you know me, I'm Dita I'm a spice girl :D, so with a lil' reworked from me, I added some kind of spices (the original recipe doesn't use anykind of spices).

And it's been a long time since I participated on the last SHF event. Now, I'm going to bring this cake to Sugar High Friday - Spice Up Your Life hosted by Anita of Dessert First.

Favourite Boiled Fruit Cake
adapted from Kue Bali by Rea

Ingredients :
375g sultana, chopped
250g raisins, chopped
250g currant
75g mixed peel
75g glazed cherry, halved (dita - I couldn't find glazed cherry, so I skipped it)
75g dried pineapple, chopped
50g dried apricot, chopped
250g butter
200g dark brown sugar
125ml brandy (dita - I used pineapple juice, another juice will do. You can even use milk)
100ml water
6 eggs, lightly beaten
1 tbsp honey
2 tsp orange zest
1 tsp lemon zest
250g cake flour (dita - I use all purpose flour)
50g self-raising flour
½ tsp baking soda
(dita) 1/4 tsp ground cinnamon
(dita) 1/2 tsp ground ginger
(dita) 1/4 tsp ground clove
(dita) 1/4 tsp ground nutmeg
(dita) 1/4 cup cashew nuts for the topping

EFC

Directions:
Mix fruits, butter, brown sugar, brandy and water altogether in a large pan. Cook without boiling until sugar has dissolved. Stir frequently. Bring to boil in low heat (put the fire only bit above the minimum level) with closed lid for +/- 10 minutes. Remove from stove. Set aside and cool (dita - I let it cool overnight).

Grease and double lined a 20x20cm or Ø24cm cake tin including its all sides. Let about 5cm extra of parchment paper out from the tin level.
Add eggs, honey, lemon zest and orange zest to boiled fruit mixture, combine well. Add sifted dry ingredients. Pour in to the prepared cake tin. If you like, you could make ornaments using nuts and glazed cherry on top. Bake at 150°C for 2 ½ hours (dita - my cake only took 1 1/2 hour, depend on the pan that you use). Wrap cake with aluminium foil, let it cool.

English Fruit Cake

Note : wrap around the pan with parchment paper or newspaper during baking.

English Fruit Cake

Spice Up Your Life with these recipes!

10.13.2008

ITB : Fruits and Nuts - Carrot Pineapple Walnut Upside-Down Cake

Fruit and veggie based cakes are always my favorite. Especially the ones with a touch of spices such as cinnamon, clove and nutmeg.

When I saw this recipe at Vania's, I raised my eyebrows. Pineapple and carrot? Sounds weird. But I was really curious because Vania said, "enak banget!" (means "so delicious!") *I always rely on your taste bud, dear :D*.

Carrot Pineapple Upside Down Cake

And yes indeed! This cake was so delectable. I love it and I assume an addition of ground cinnamon would make it perfect.

I want to bring this cake to In The Bag-September : Fruits and Nuts hosted by my dear friend, Scott of realepicurean. But ohh la la...I just realized that I'm late :( *kamana wae neng?*, I forgot the deadline date is Oct 5th. Then I told Scott that I'm sorry I cannot participate on this event. But he still counting me in and asked me to submit my entry *thanks Scott, how generous you are ;)*

Carrot Pineapple Upside Down Cake

Carrot Pineapple Upside-down Cake
Source: Better Homes and Gardens India, April 2008 (copied from Vania's)
prep: 30 min, bake 45 min, cook 35 min.

Ingredients :
1/3 cup packed brown sugar
2 tbsp butter
1 tbsp water
6-8 1/2 inch thick slices fresh pineapple, cored and halved
2 cups all purpose flour
1 tbsp baking powder
1/2 tsp salt
1/tsp ground nutmeg
1/2 cup butter, softened
1 cup granulated sugar (dita - I used light brown sugar)
2 eggs
1 tsp vanilla
3/4 cup milk
3 carrots, finely shredded (1 1/2 cups)
(dita - I added 1/2 cup walnut)

Directions :
1. Preheat Oven to 350F. Lightly coat a 9x9x2 inch baking pan with non-stick cooking spray or oil; set aside.
2. In a small sauce pan, combine brown sugar, 2 tbsp butter, and water. Cook and stir over medium heat until mixture comes to boiling and is smooth. Pour in prepared pan; tilt to evenly coat bottom. Arrange pineapple slices over top.
3. In a medium bowl, combine flour, baking powder, salt and nutmeg; set aside.
4. In a large mixing bowl, beat 1/2 cup butter on medium-high for 30 seconds. Gradually add granulated sugar, beating until combined; beat 2 minutes more. Add eggs, one at a time, beating well after each addition. Beat in vanilla. Alternally add flour mixture and 3/4 cup milk; beat on low after each just until combined. Stir in carrots. Add walnut (dita). Spread batter over pineapple.
5. Bake 45 minutes or until golden and wooden pick inserted in centre comes our clean. Cool in pan on the rack for 5 minutes. Invert on platter. Cool 30 minutes.

Flower

10.09.2008

Home Food Photography # 4 : Konsep

Home Food Photography datang lagi dengan seri # 4-nya! Maaf lama absen soalnya bulan-bulan kemaren banyak kesibukan (yang sok dicari). Mohon maaf lahir batin sebelumnya buat temen-temen yang merayakan Idul Fitri, maaf kalo pernah ada salah-salah kata, salah-salah ketik dan salah-salah round up :D.

Terus terang, belakangan ini gue makin bangga dengan eksistensi Foodie Blogger Indonesia (FBI) di antara para Foodie Blogger dunia. Karya-karya foto temen-temen dan sahabat-sahabat FBI bener-bener gak dipandang sebelah mata. Makanya jangan heran, sekarang kalo masuk ke event-event food photography macem CLICK, DMBLGIT (Does My Blog Look Good In It) atau Inspiring Food Photography, kita bakal menemukan salah satu karya FBI bersanding dengan manisnya di antara jajaran pemenang. Sebutlah sahabat-sahabat gue Arfi Binsted, Elsye Suranto, Irma Rode, Dwiana Poter (Dwi, kenapa blog lo gak bisa diliat?), Sheila, Mindy Jordan, Sefa Firdaus, Eliza, Vania, Pepy Pattern, Ema yang karyanya boleh dibilang sudah diakui foodie blogger dunia.

Silahkan mampir ke FLICKR KBB (yang isinya karya foto para FBI) untuk membuktikan tulisan gue ini, bahwa kemampuan FBI dalam bidang food photography boleh dikata gak diragukan lagi. Khusus temen-temen KBB, gue semakin bangga dengan karya-karya kalian yang dari hari ke hari terus menunjukkan kemajuan dan pantang menyerah belajar (walopun gak punya DSLR tapi semangat memaksimalkan fungsi kamera sakunya, walopun gak punya fancy studio tapi bisa menghasilkan foto-foto bagus).

Nah, ngomong-ngomong soal foto bagus....relatif ya memang sifatnya, soalnya hubungannya sama selera. Paling nggak dari foto-foto juara temen-temen kita bisa belajar, kira-kira foto seperti apa yang layak dikatakan bagus. Kenapa foto-foto mereka bisa keluar sebagai pemenang di event-event online dunia. Karena motretnya gak asal!! Yak becul!! Gak asal jepret. Semuanya dipikirin. Nih, bocoran dikit....apa sih komponen-komponen yang diperhitungkan dalam event-event online food photography itu?

Ini nih beberapa komponen yang harus diperhatikan :
KONSEP, KOMPOSISI, LIGHTING, KOMUNIKASI, STYLING

Niat??? Emang iya! Harus! Kalo kita berangkat motret gak pake konsep, mana bisa punya nyawa fotonya, secara yang dipotret benda mati, MAKANAN.

Mungkin buat sebagian orang, ngapain sih capek-capek? Tinggal jepret makanannya (karet kali) masukin blog udah deh cerita selesai. Heeyyy...we're talking about a bunch of people yang punya interest di sini. Sama aja deh kayak orang yang punya hobi tertentu. Kadang suka melakukan hal-hal yang dirasa gak masuk akal :).

Mungkin emang capek ya kalo setiap motret kita harus mikirin konsepnya. Kadang gue juga suka kehabisan energi atau mati gaya gak tau musti gimana dengan obyek foto gue. Jangan salah, banyak juga foto-foto gue yang gak pake konsep :D. Biasanya kalo udah kejer setoran postingan. Karena udah diburu-buru pingin nge-post, akhirnya foto juga dibikin cepet-cepetan.

Nah, lewat HFP # 4, yang kali ini mengambil tema KONSEP. Udah baca seri "Sharing Food Photography" yang ini? Yuk kita praktekin dan belajar dikit-dikit gimana menghasilkan foto yang punya konsep/tema. Susah? Gak lah. Katanya mau belajar. Kan misi utama event ini buat sama-sama belajar bukan sekedar lucu-lucuan.


"Assignment"-nya bikin satu buah foto dengan tema tertentu yang diinginkan (bebaskan imajinasi). Ngomongin konsep gak bakal lepas dari komposisi, komunikasi, lighting dan styling yang diinginkan. Jadi silahkan cerita foto yang disubmit konsepnya apa berikut komposisi, styling dan lighting yang dipilih.

Ini pancingannya :D :

Breakfast

Gue mengambil tema pagi yang indah dan penuh semangat untuk foto di atas. Untuk menggambarkan suasana makan pagi yang cheery dan cerah, perlu elemen-elemen yang sifatnya optimis dan happy. Misal : gue sengaja pilih warna pink untuk kesan ceria di pagi hari dengan sentuhan tanaman berwarna hijau di belakang dan bunga di pink di meja untuk memberikan kesan "hidup". Cahaya yang gue gunakan adalah natural light dengan pemilihan backlight yang menghasilkan cahaya dengan efek over exposed di background sehingga terkesan light/airy. Sementara bagian depan sengaja lebih sedikit gelap untuk mendapatkan kesan homey dan hangat. Sengaja diambil medium shot supaya terlihat ambiance di sekitar obyek. Mudah kan?

Ini masih satu seri dengan foto di atas :

Beautiful MorningBellaBeautiful MorningCheery

Seperti biasa format pengiriman entry (HARAP DIPERHATIKAN BAIK-BAIK YA, supaya gak bolak-balik terjadi kesalahan) :
Nama :
Nama blog dan alamat blog :
Judul dan URL post :
Foto (ukuran gede boleh)
Please do make a link from your post to this post
Kirimkan ke charmawendi AT gmail DOTCOM dengan subyek : HFP # 4
Logo silahkan comot dari atas.

Event dibuka dari tanggal 9 Oktober 2008 sampai 10 November 2008. Round Up seperti biasa 3 hari sesudah deadline, syukur-syukur bisa lebih cepet :P.

Beautiful Morning-tag

Related posts :
1. HFP # 1 : A Tiring Job!
2. HFP # 1 : The Round Up
3. HFP # 2 : Gila Properti!
4. HFP # 2 : The Round Up
5. HFP # 3 : 'Studio'
6. HFP # 3 : The Round Up
7. Komposisi dan Styling