6.30.2008

Potato Soup


I know I know this is not so summery dish ;), but I was so craving for soup, especially thick soup. And I'd love to bring this soup to Monthly Foodie Multipliers # 16 : Soup hosted by Vin. Vin, here's my potluck!

Potato Soup

Here's the original recipe. I used potato instead of butternut squash. Didn't make the Gruyere Croutons but I ate the soup with Buterhorn Garlic Knots (recipe will be blogged soon). This recipe calls for cumin, you know I'm not a big fans of cumin. Sometimes, its smell disturbed my appetite, but this......ooohhhh...how I love the smoky flavor of the cumin in it!

Potato Soup

Butternut Squash Soup with Gruyere Croutons
source : Alyson originally adapted from Bon Appetite

Ingredients :
1/4 cup (1/2 stick) butter
1 large onion, finely chopped
4 large garlic cloves, chopped
4 1/2 cups chicken broth
3 lbs butternut squash, peeled and cut into 1 inch pieces
1 1/4 tsp minced fresh thyme
1 1/4 tsp minced fresh sage
2 tsp ground cumin
1 tsp ground ginger
1/8 cup whipping cream

Directions :
• melt butter in large pot over medium heat. add onion and garlic and saute until tender, about 10 minutes.
• add broth, squash and herbs; bring to boil.
• reduce heat, cover and simmer until squash is very tender, about 30 minutes.
• working in batches, puree soup in blender. return soup to same pot.
• stir in cream; bring to simmer. season with salt and pepper.

can be made 1 day ahead. chill. rewarm over medium heat before serving.

for crouton
Ingredients :
4 cups cubed bread slices
1 cup grated Gruyere cheese
1 tsp minced fresh thyme
1 tsp minced fresh sage
2 tbsp olive oil

Directions :
• preheat broiler.
• arrange bread cubes on baking sheet.
• drizzle olive oil over top of cubes. toss with hands.
• sprinkle cheese, then thyme and sage over bread cubes.
• broil until golden, about 1 minute. re-arrange cubes and broil for about 1 minute more.

• ladle soup into bowls and top with croutons. grate an additional amount of cheese on top if desired.

Memaksimalkan Fungsi Kamera Saku Digital

Nikon Coolpix P 1

Anjriittt....judulnya serius banget!!......wakakakakkkk!!! Ini sebenernya requestnya Ipoet yang minta tuntunan penggunaan kamera-nya dan beberapa teman yang secara pribadi melayangkan e-mail ke gue, meragukan kemampuan kamera saku/pocket digitalnya yang gak bisa bikin foto bagus. Halah Poet, gue ini sebenernya gak PD memberimu tuntunan, karena gue sendiri adalah orang yang paling males membuka manual book dan culun banget sama yang namanya teori photography. *Sapa sih gue ini?* Maksudnya Ipoet mungkin, gimana ya memaksimalkan kamera saku digital gue? *gitu kan Poet?*

Aku masih inget, jaman dulu kalo si Babe bawel nerangin ini itu tentang teori-teori photography dan pengenalan kamera, kayaknya Babe ngomong berbusa-busa, guenya masuk kuping kiri keluar kuping kanan *ya iyalah! abis yang diterangin juga anak baru kelas 3 SD*. Tapi Babe gak pernah putus asa, dia emang obsesi banget anak-anaknya ada yang punya kemampuan photography seperti dia. Tapi dasar guenya yang bolor kali ye, sering gak nyimaknya. Cuman makin ke sini makin kusadari, kayaknya apa yang dulu-dulu sering diomongin Babe itu nempel di alam bawah sadar gue......hahahahha.....segitu didoktrinnya gue!! Malahan sekarang kalo ngomongin soal photography sama Babe dan adikku, gue jadi lebih nyambung karena ilmu-ilmunya beliau yang tertanam di benak gue.

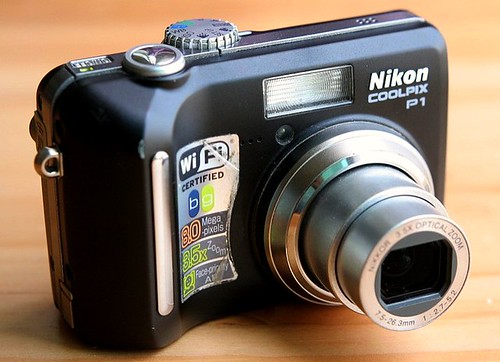
Okeh, sekarang ke soal kameranya Ipoet. Gue akan coba bantu dan nggambarinnya gak ribet-ribet pake istilah photography advance (pake istilah awam aja ya). Mudah-mudahan bisa dimengerti dan ini based pengalaman gue loh, jadi kalo ada temen lain yang punya pengalaman berbeda silahkan ditambahkan di kolom comment di bawah, biar kita bisa saling menambahkan. Yang akan gue share di sini adalah hal yang basic banget tapi penting diketahui. Sorry juga buat yang lain kalo postingan ini terlalu spesifik ke Nikon, karena memang untuk kamera digital pocket, merk ini yang gue gunakan. Gue sendiri memakai Nikon Coolpix P1 keluaran tahun 2005 dengan resolusi 8 MP. Cukup lama gue menggunakan kamera ini untuk membuat foto-foto makanan, sebelum akhirnya gue menggunakan kamera DSLR keluaran Canon. Bahkan sampe sekarang, kadang gue masih memakai kamera ini untuk food photography.

Menurut Ipoet kamera yang digunakan adalah Nikon Coolpix 7600. Setelah mencoba membaca spesifikasi dan review produknya (silahkan baca spesifikasinya di sini) dan membandingkannya dengan P1 gue (silahkan baca spesifikasi Nikon Coolpix P1 di sini), setidaknya gue ada sedikit gambaran mengenai "senjata" yang kamu pakai.

Hampir sama memang, tapi ada beberapa fitur yang gak dimiliki oleh 7600. Untuk food photography ada 2 setting kuncian yang biasa gue pakai :

A. Fitur Aperture Priority yang biasanya ditandai dengan "A" di roda menu kadang ada juga yang menggunakan "AV" atau Aperture Value. Seperti halnya P1, 7600 juga punya aperture range yang hampir sama. P1 : 2.7-5.2, sedangkan 7600 : 2.8-4.8. Sayangnya 7600 gak punya fitur "A" ini, Poet. Padahal mode ini enak dikutak-katik untuk food photography. Jadi alasan utama menggunakan mode Aperture Priority adalah untuk mengkontrol Depth of Field (DOF) atau gampangnya area fokus dari sebuah objek *begitu bukan yak bahasa Indonesianya?*. Dalam food photography, ini penting karena fokus berada di objek makanan, terkadang background perlu dibuat out of focus supaya tidak mengganggu penampilan si bintang utama :). Tapi bukan berarti setiap food photo harus punya backgound blur loh. Gak selalu. Terkadang juga kita perlu menampilkan ambience dan mood dari makanan tersebut. Maka dari itu, dengan menggunakan mode ini supaya kita bisa mengatur ketajaman backgroundnya tergantung kebutuhan dan selera.

Aperture itu sendiri apa sih? Aperture adalah diameter bukaan lensa. Semakin besar diameter bukaan berarti semakin banyak pula cahaya yang masuk. Aperture biasa ditunjukkan sebagai f-stop, misalnya nih : f/2.8 atau F 2.8. Semakin kecil angka f-stop misalnya f/2.8, semakin besar diameter bukaan lensa dan area ketajaman jarak tangkap terhadap objek semakin sempit (makanya backgroundnya bisa jadi blur), demikian pula sebaliknya, semakin besar angkanya misalnya 8 akan semakin kecil bukaan lensa dan area ketajaman semakin luas.


Image coutesy of Photoxels

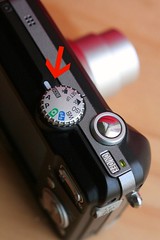
Cara men-set up Aperture Priority pada Nikon Coolpix P1 :
1. Pilih ikon "A" pada roda menu

Nikon

2. Kemudian pilih ikon "+/-" untuk mengatur setting aperture. Tekan ke kiri untuk angka f-stop lebih kecil dan ke kanan untuk angka yang lebih besar.

Nikon

Nikon

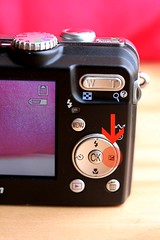
3. Lalu tekan ikon bergambar bunga, OK dan pilih ikon bunga lagi di dalamnya.

Nikon

B. Kalo gak ada fitur "A", kita bisa gunakan fitur lainnya, yaitu "SCENE".

Cara men-set up menu "SCENE" :
1. Pilih ikon "SCENE" pada roda menu.

Nikon

2. Kemudian tekan tombol "MENU"

Nikon

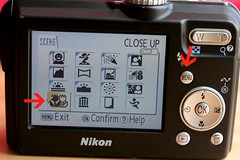
3. Kemudian biasanya gue pilih setting Close Up yang ditandai dengan ikon bunga. Lalu tekan OK. Nanti akan ada pilihan "NORMAL", "EFFECT 1" dan "EFFECT 2". Pilih aja yang "NORMAL", nanti kalo mau eksperimen silahkan pilih-pilih yang lain :).

Nikon Coolpix P 1

Jangan lupa :
1. Sesuaikan ISOnya. Walopun ada pilihan Auto, gue lebih suka diset sesuai kebutuhan.
2. Utak-atik menu WB atau White Balance, gue lebih sering menggunakan pilihan AUTO. Mungkin nanti kamu akan menemui hasil foto terlalu merah atau terlalu kuning atau malah cenderung biru, coba WBnya di set ulang :
1. Pilih ikon "WB" dari roda menu.

Nikon

2. Kemudian pilih "PRE" White Balance Preset.

Nikon

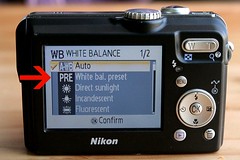
3. Arahkan/fokuskan kamera pada selembar kertas putih di ruangan/tempat di mana obyek foto berada. Dan kamera bisa digunakan kembali.

Mudah-mudahan sampe sini cukup komunikatif dan mudah dimengerti ya.

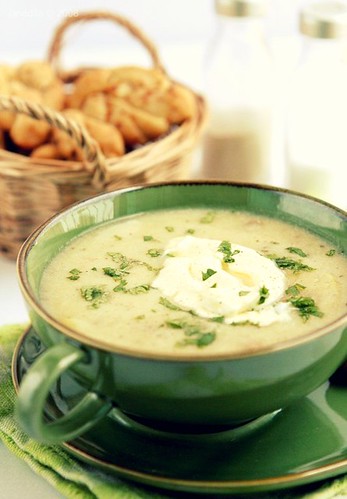
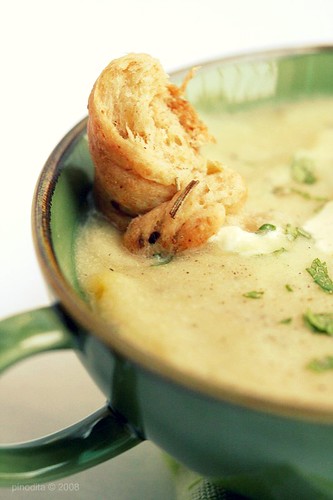
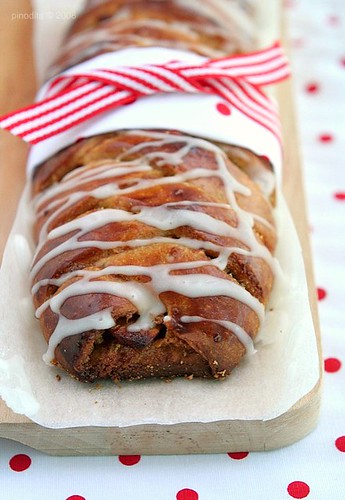
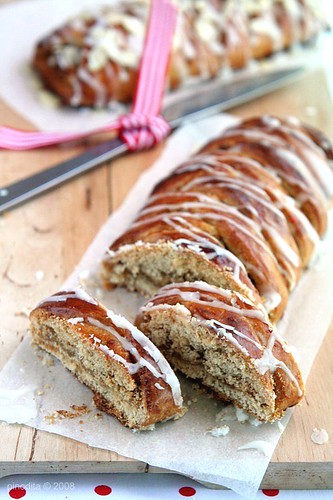
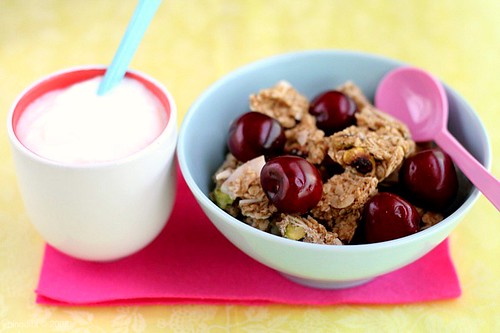
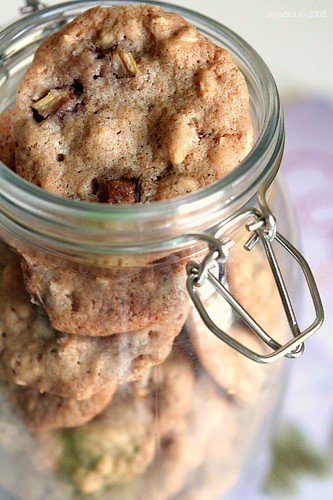
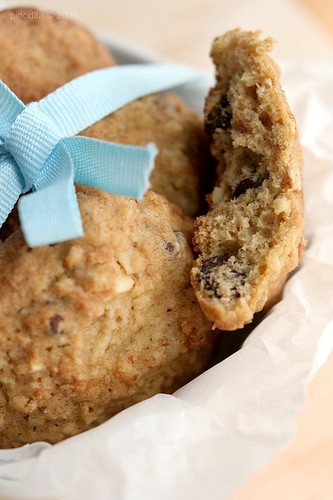
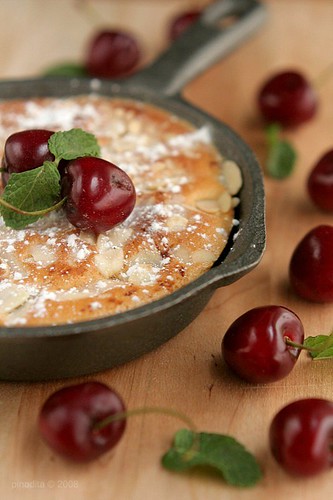
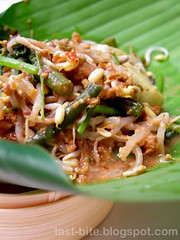
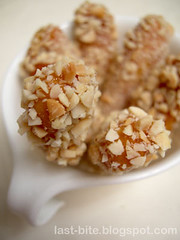
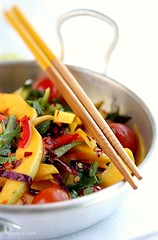
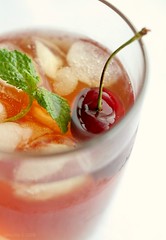
Ini beberapa contoh foto yang gue ambil dengan Nikon Coolpix P 1 :

Mango Sorbet Pecel
Lontong Paris Feeling Romantic Cuppies

Kalo setting sudah ok, ada beberapa hal lagi yang penting diperhatikan (ini bisa dipelajari sambil jalan) :
1. Berhubung ini kamera saku, gak ada external flash juga kan? Lighting adalah satu hal yang sangat penting diperhatikan. Tentunya sumber cahaya yang oke dan murah meriah adalah cahaya natural. Pilih spot foto yang cukup mendapatkan cahaya. Sebisa mungkin hindari direct light (karena jatuhnya cahaya ke objek akan terlalu keras dan hasilnya akan kurang bagus). Pilih tepat di pinggir jendela (seperti yang sering gue lakukan) atau kalo ada teras ya di teras.

Behind The Scene : Banana Chocolate Chips Cookies

2. Komposisi. Semakin sering kita berlatih, semakin luwes kita menentukan komposisi (halah, gue aja masih sering mati gaya nyari kompo yang enak). Gue bukan penganut pakem rule of thirds (more about it here). Capek mikirin yang kayak gitu-gitu, mending eksperimen komposisi sebebas-bebasnya. Saran gue gabung deh sama klub-klub food photography yang sekarang berhamburan di FLICKR. Semakin banyak melihat karya orang, kita juga semakin banyak belajar, bisa bertukar pikiran pula dengan pakar-pakarnya, GRATIS!! :D
3. Sejalan dengan praktek yang sering dilakukan dan mlototin karya food photography orang, kita juga akan bisa membaca trend-trend komposisi yang sedang berlaku sekarang. Trend frame-frame miring sepertinya sudah ditinggalkan dalam food photography. Yang sekarang sedang in adalah trend-trend yang minimalis (dari segi properti dan tabletop setting), berkesan airy atau ringan, dengan cahaya yang soft atau malah memanfaatkan backlight dan angle bird's eye view alias mengambil gambar 180˚ dari tampak atas.

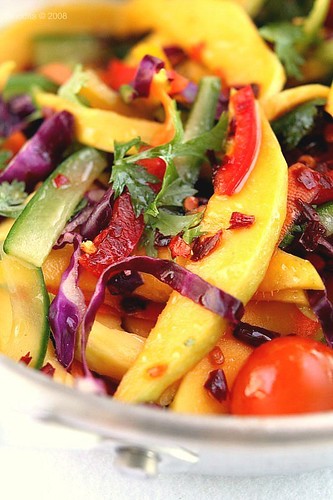
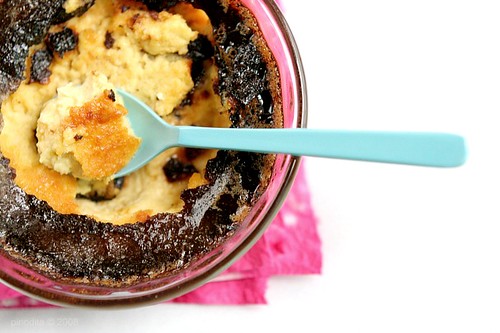
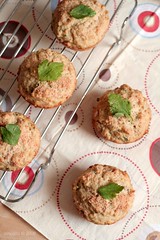
Ini contoh pengambilan secara bird's eye view :

Tuna Parmesan MuffinSLW : EggsGerman Apple Cake

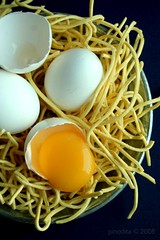
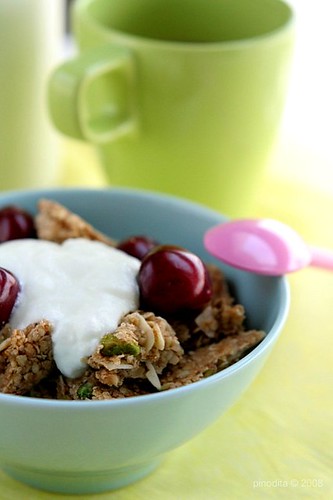
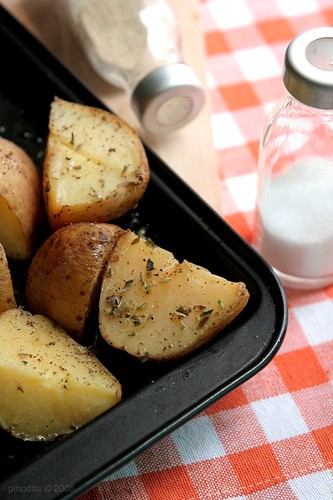
Ini contoh foto memanfaatkan backlight (gak direct sih, tapi memanfaatkan sinar dari belakang dengan angle pengambilan agak serong):

Spicy Mango SaladIce Minty TeaBanana Pistachio Biscotti

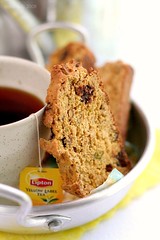
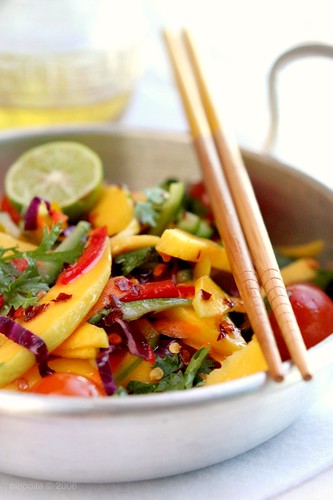
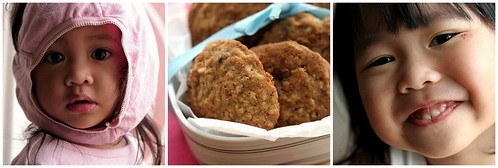
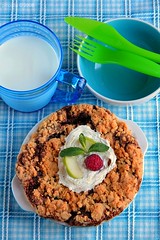
Nah, ini loh contoh foto miring yang sekarang dah 'basi' :P (foto ini juga diambil menggunakan Nikon Coolpix P1 ) :


4. Food styling. Plototin deh majalah-majalah cuisine, gourmet, kuliner atau apalah namanya yang berhubungan dengan foto-foto makanan. Googling around di internet juga banyak. Sekarang banyak food stylist yang punya blog atau website. Bisa jadi sumber inspirasi yang besar nih. Food styling adalah elemen penting untuk menggugah selera orang. Tujuan food photography adalah menghasilkan foto yang apik dengan unsur membuat mulut mouth watering alias ngiler pengen makan :D.
Main deh ke blognya Jaden, Beatrice dan Sabra. Amati karya-karya food photography mereka (Jaden dan Bea adalah food journalist). Kalo mungkin berteman dengan mereka, mereka gak pelit berbagi ilmu :). Dan masih banyak lagi teman-teman foodie blogger di luar sana yang sangat berbakat dan dengan senang hati mau berbagi ilmu dengan kita-kita.
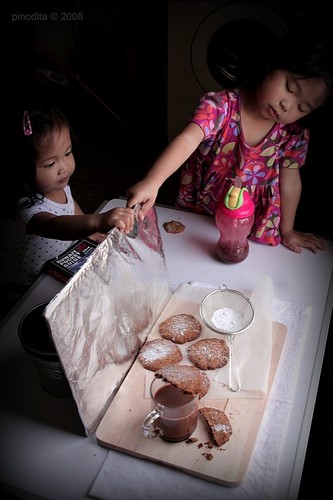
5. Sedia reflektor sebelum kekurangan cahaya :P. Bikin aja sendiri dari cardboard kemudian dibungkus aluminium foil, sudah sangat membantu mengisi cahaya di tempat-tempat yang butuh cahaya. Buat gue, reflektor adalah must have item.

See my reflector? ;)

Behind the Scene : Asisten

Yang penting, kenali dulu deh kamera sakunya. Utak-atik eksperimen hasilnya ancur gak papa, justru dari situ kita bisa belajar. Jadi tau salahnya di mana, gak enaknya di mana, dll. Gue gak percaya kamera digital pocket (minimal 5 megapixel-lah)gak bisa bikin karya bagus. Kameramu itu bisa banget tuh Poet "diperkosa" untuk bikin foto-foto apik ;).

Sorry kalo ada yang kurang, gue tuh gak bakat deh jadi dosen ato guru yang pinter nerangin, dan gue pun masih terus belajar, ini sedikit yang bisa gue bagi ke teman-teman. Kalo ada pertanyaan lanjutan, yuk kita diskusikan di kolom "COMMENT" :).

Happy exploring your digital pocket camera! Sorry kalo penjelasannya terkesan asal goblek :P, moga-moga bisa membantu.

Related Link :
Kamera Saku Gak Bisa Bikin Foto Bagus? by Arfi

6.29.2008

Cooking Friday # 5 : Glazed Apple Lattice Coffee Cake

Glazed Apple Lattice Coffee Cake

I saw this coffee cake at Patricia's, my sweet foodie blogger buddy. Yes, it was love at the first sight. I never knew Glazed Apple Lattice before, so that was just my first time ever. And I was just so curious to try the recipe out. With that lattice top and the drizzle of the icing, it was just so pretty!

So I e-mailed dear Pati, asked a few things and I told her this would be great for my 5th episode of cooking podcast project "COOKING FRIDAY".

Just don't get fooled by the long list of ingredients. This delectable and fragrant coffee cake does take a bit of time to prepare, but is actually quite easy to make, and well worth the effort. The recipe itself is very detailed and well explained. It calls for orange zest but since I didn't have one, I substitute it for keylime zest.

When I made this, actually it wasn't really perfect at proofing stage. The dough didn't rise perfectly and doubled in volume. I doubt it and thought, "this is not gonna work!"

But to my surprise, when it came out from the oven, this coffee cake turned out so wonderful and rise perfectly (at least to me...hahaha), not to mentioned the fragrant of the cake hhmmm....makes my mouth watering!

Thanks for sharing, Patricia. The result was superb! I never expected the combination beetwen cardamon, nutmeg and cinnamon could be so delish!


Glazed Apple Lattice Coffee Cake
source : Bon Appetit, Oct 2007 via Patricia's

Glazed Apple Lattice Coffee Cake

Dough:
2 tablespoons warm water (40 to 46ºC/105ºF to 115ºF)
1 package (2 ¼ teaspoons) active dry yeast

½ cup (120ml) whole milk
6 tablespoons sugar
5 tablespoons (70g) unsalted butter, diced, room temperature
1 teaspoon salt
2 large egg yolks
1 teaspoon finely grated orange zest (dita-I used keylime zest)
½ teaspoon ground cardamom
¼ teaspoon ground nutmeg
2 to 2 ¼ cups (280 to 315g) all purpose flour

Filling:
2 tablespoons (¼ stick) unsalted butter
6 tablespoons (packed) golden brown sugar
1 ¼ pounds (565g) Golden Delicious apples (about 3 medium), peeled, cored, quartered, cut crosswise into ¼-inch slices
1 teaspoon finely grated orange zest (dita-I used keylime zest)
1 teaspoon finely grated lemon zest (dita-I used keylime zest)
½ teaspoon ground cinnamon
1/8 teaspoon ground cardamom
1/8 teaspoon ground nutmeg

Nonstick vegetable oil spray or vegetable oil
1/3 cup finely crumbled vanilla wafer cookies or soft ladyfingers

Icing

Glaze :
1 ½ cups powdered sugar (dita-I only used 5 tablespoon)
2 tablespoons (or more) orange juice (dita-I used keylime juice)

Start with the dough: place 2 tablespoons warm water in small cup. Mix in yeast. Let stand until yeast dissolves, about 6 minutes.

Stir milk, sugar, butter, and salt in medium saucepan over medium-low heat just until sugar dissolves and butter melts (mixture should be just warm). Scrape milk mixture into large bowl; cool to lukewarm if necessary. Whisk in yeast mixture, egg yolks, orange peel, and spices. Add 2 cups flour; mix with rubber spatula until dough comes together. Turn dough out onto floured work surface. Knead until smooth and silky, sprinkling with more flour by tablespoonfuls as needed, about 6 minutes – it’s a very tender dough, delicious to work with. Place in clean large bowl. Cover with plastic wrap and kitchen towel. Place in warm draft-free area (I use my microwave oven); let rise until light and almost doubled in volume, about 2 ½ hours.

Now, the filling: melt butter in heavy medium skillet over medium-high heat. Add brown sugar. Cook until thick grainy sauce forms, about 1 minute. Mix in apples. Cook until apples are tender and sauce is reduced to glaze, tossing often, about 7 minutes. Mix in all grated peel and spices. Cool filling at least 30 minutes and up to 3 hours.

Place large sheet of foil (dita-I used parchment paper) on work surface; spray with nonstick spray. Turn dough out onto foil. Roll out to 14x12-inch (35x30cm) rectangle. Sprinkle cookie crumbs in 4-inch-wide (10cm) strip down center, leaving ½-inch (1.25cm) border at top and bottom. Arrange apples with any juices atop crumbs. Starting ½ inch (1.25cm) from each long side of apples, cut straight to edge of dough at 1-inch (2.5cm) intervals, making about 13 strips on each side. Fold dough strips alternately and on slight angle over filling, forming lattice. Seal open ends of dough.

Slide foil with dough onto large rimmed baking sheet; trim foil overhang. Cover cake loosely with plastic and towel. Place cake in warm draft-free area; let dough rise until light and puffy, about 1 ¾ hours.

Preheat oven to 190ºC/375ºF. Bake cake uncovered until golden brown, 30 to 35 minutes. Cool 30 minutes.

For glaze:
Mix powdered sugar and 2 tablespoons orange juice in small bowl to blend, adding more juice by ½ teaspoonfuls if too thick. Drizzle glaze over cake. Gently run spatula under cake to loosen from foil. Cut crosswise into slices. Serve slightly warm or at room temperature.

Makes 8-10 servings

Previous episodes :
1. Cooking Friday # 1 : Pie Crust
2. Cooking Friday # 2 : Banana Cake
3. Cooking Friday # 3 : Elmo Pizza (Baking with Kids)
4. Cooking Friday # 4 : Banana Chocolate Chips Cookies

Homemade Granola

Happy Sunday everyone! (though it's not a perfect Sunday for us, we have problem with our air conditioner, it runs but it doesn't cool, meanwhile it's 50˚C outside! *sigh....I'm burning here!*)

So, let's have some energizing breakfast!


Homemades Granola

I'm a mother of two toddlers and I always try to involve my kids in cooking and baking as much as I can, mainly as a way to make sure they eat healthy and good food. And I think that would be a good way to teach them that homemade food is one thing they should appreciate *say no to junk food please*.

One of the healthy choice to start their day is granola breakfast. And they can make with me, choosing their favorite dried fruits or nuts, just customizing as they like. They used to eat that with yoghurt and fresh fruits such as cherries, strawberries or banana or just eat as it is.

Homemades Granola

This recipe is totally adaptable, just mix your favorite dried fruits or nuts for a different experience. It can be make in big batches and you can do lots of different thing with it. Not only you can vary the granola, but you can vary the ways you eat it, as well : plain, with milk, with fresh fruits, with milk, with honey, etc.

Homemade Granola
source : Alyson of Milk Eggs and Chocolate

Making Granola

Ingredients :
2 cups old-fashioned oats
3/4 cup whole pecans, halved
1/2 cup sweetened flaked coconut
1/2 cup pumpkins seeds
1/3 cup (packed) brown sugar
1 1/2 tsp ground allspice
1 tsp ground cinnamon
1/4 cup (1/2 stick) unsalted butter
2 tbsp honey
1 cup (packed) dried organic cherries, cut into quarters

Directions :
• preheat oven to 300°F.
• mix first 7 ingredients in large bowl.
• melt butter with honey in heavy small saucepan over low heat. pour over granola mixture and toss well. spread out mixture on baking sheet.
• bake 20 minutes, stirring occasionally.
• add cherries; mix to separate any clumps. continue to bake until granola is golden brown, stirring frequently, about 15 minutes longer. cool.
• can be made 2 weeks ahead. store airtight at room temperature.

6.27.2008

Finest Foodie Friday-June 27, 2008


I was wondering when Kimi told me that I made the Finest Foodies Friday pick this week at The Leftover Queen! What was that supposed to mean? So I went straight to Jenn's. And taarraaa...I was so surprised, I found my blog listed as this weeks picks.

If you don't know what it's all about, every Friday Jenn of The Leftover Queen picks 5 blogs from The Foodie BlogRoll to be featured. If you have a food blog but you are not yet a member, please join the fun here.

Now please go visit The Left Over Queen and find out all five of her picks this week.

Thanks for the compliment Jenn. I'm so honored.

Monthly Mingle # 23 : Mango Mania

It's summer and it's time for mango!

Mango

In Kuwait, these exotic fruits arrive from India and Phillipine. And they are quite pricey! :( *ohhh how I miss mango season in my homecountry! Inexpensive and abundant throughout the season*

Mango is one of the tastes of my childhood. They have a unique flavor, meltingly sweet, soft and exoticly perfumed. Simply eat the ripe ones. Or if they are included in the recipe, I try to keep them as simple as possible to showcase their fragrant.

Vietnamese Mango Salad

Mango salad is my favorite. Simple and breathtakingly fresh. Here's my contribution for Monthly Mingle # 23 : Mango Mania hosting by Meeta of What's for lunch honey.


Vietnamese Mango Salad
from : Vietnamese Favorites - Women's Weekly

Ingredients (just be creative to mix the herbs ;)):
2 large mangoes, chopped coarsely
1 small red onion, sliced thinly
1 fresh long red chilli, sliced thinly
1 1/2 bean sprouts
1/2 cup coarsely chopped fresh coriander

Dressing :
2 tsp fish sauce
2 tsp grated palm sugar
2 tbsp lime juice
1 tbsp peanut oil (dita-I used olive oil)

Vietnamese Mango Salad

Directions :
Place ingredients in medium bowl, drizzle with the dressing and toss gently.

Rhubarb Cookies


image courtesy of allotment.org.uk

When everybody's talking about rhubarb and I found so many recipes call for rhubarb, I thought it was somekind of fruit. Because it's most often treated as a fruit (and people said it tastes sour) such as rhubarb pie, rhubarb cake, rhubarb clafoutis, etc. But botanically speaking, rhubarb is considered a vegetables. In my homecountry, Indonesia, rhubarb it's not popular, because it needs cool area to be grown, that's why I never saw this kind of veggie before.

I was quite surprise, when I found rhubarb in The Sultan Center Kuwait. I'm not so sure whether they grown it here ;) *hayy it's almost 50˚C here!* or imported from somewhere else. Silly me, I bought some stalks just to omit my curiousity without thinking what would I do with these stuffs. Then, they sat nicely in my fridge for couple of days :p

One day, I wanted to make cookies for the girls and remembered my rhubarbs. Just popped in my mind, rhubarb cookies! But wasn't so sure is there any rhubarb cookies recipe? I heard rhubarb pie before or rhubarb jam or rhubarb cake. But rhubarb cookies?

Rhubarb Cookies

Visit this cool site! You can find various rhubarb recipes. Sweet, savory, salad, soup, muffin, bread, cookies, smoothie, pudding, jam, anykind of desserts, you name it!

Here's the recipe! It turned out good, I like the combination of the sweetness, the fragrant of the spices and a little hint of sourness.

Rhubarb Cookies

Rhubarb Cookies
from RhubarbRecipes

Ingredients :
1 1/3 cups brown sugar
1/2 cup butter, unsalted (softened)
1 egg
1 teaspoon vanilla
teaspoons milk
2 cups all-purpose flour
1/2 teaspoon salt
1 teaspoon cinnamon
1/2 teaspoon clove
1/2 teaspoon nutmeg
1 teaspoon baking soda
1/2 cup coconut
1 cup crasins or raisins
1 cup fresh rhubarb (fine chopped)
1 cup chopped walnuts

Directions :
Preheat oven to 350 degrees. In a large mixing bowl add softened butter and cream together, add eggs and vanilla and beat until creamed. In a smaller bowl mix all dry ingredients and stir to combine. Add milk to the dry ingredient mixture and beat just until combined. Stir in rhubarb, coconut and walnuts. On a prepared cookie sheet drop about 1 heaping tablespoon of batter per cookie. Place only about 12 cookies per sheet as they will spread. Bake 12-14 minutes or until light golden brown. Remove pan from oven, let cookies sit on the baking sheet 1-2 minutes before removing them to a cooling rack.

6.24.2008

Egg Yolks Recipe # 2 : Creme Brulee

As I posted before, here's another egg yolks recipe. This is a fancy dessert. But I blew it!! Hahahaha...look what I did to my creme brulee! I overburned the caramel layer over the creme :P.

Creme Brulee

I know I know, I should burned it with blowtorch. But, I didn't have one. So I burned the sugar under the grill. I put the oven into BBQ-setting, for electrical ovens, and wait until the coils are glowing red. Place the cremes directly under the BBQ-heat-source as close as it gets (you want maximum heat - the quicker the operation goes, the better, you do not want to heat the custard too much...but I did *LOL*). Just be careful when you want to do this way, keep an eye on it.

The caramel may overburned, but the taste was seriously divine. It was heavenly melting in your mouth ;).

Creme Brulee

Creme Brulee
by Michael Chu of Cookingforengineers

Ingredients:
2 cups heavy cream, 1/2 teaspoon vanilla extract, 8 large egg yolks, and 1/2 cup sugar.

Directions :
1. First pour the sugar into the egg yolks.
2. Heat the heavy cream until almost simmering (you can bring to a simmer and let cool a minute). Add heavy cream to the egg yolks on tablespoon at a time while stirring vigorously. This will temper the eggs so as to not curdle them (or make scrambled eggs) when exposed to the heat of the heavy cream.
3. When about 1/4 cup of heavy cream has been integrated into the yolks, pour the yolks into the heavy cream and mix until smooth.
4. Now, use a fine mesh sieve and strain the custard mixture to remove and small clumps that may remain the mixture. This step will help ensure a silky texture to the custard. Blend in the vanilla extract after the mixture has been strained.
5. Pour the mixture into six to eight ramekins depending on size. (Makes a little more than eight four ounce creme brulees.) In the picture below, I filled six four ounce ramekins and two six ounce ramekins (the six ouncers were not full).
6. Place the ramekins in a baking pan. Pour boiling water into the pan (be careful not to get water into the ramekins), so that the water level is halfway up the sides of the ramekins. Cooking the custards in a water bath will provide a low even temperature for the custards to cook evenly and set properly. Place in an oven preheated to 250?F for about one hour.
7. After an hour, check to see if the custards are done. We want them to be set on the outside edge, but jiggly (like jello) at the center. The easiest way to do this is to take a pair of tongs with food grade rubber bands wrapped around the ends to help grip the ramekins. Pick up a ramekin and shake to see if the centers jiggle. If the only the center jiggles a little, it's done. If the whole thing is set, remove immediately - it'll be a little over done, but still delicious. If it's not done, just put it back in the water bath and check again in ten minutes. Once the custards are done, let them cool on a cooling rack to room temperature. This will let the custards finish cooking the centers on their own.
8. Wrap in plastic wrap and refrigerate for at least eight hours before serving.
9. About an hour before serving, remove the plastic wrap from each ramekin and use a paper towel to gently soak up any moisture that may be extruded from the custard tops. Pour about a teaspoon of turbinado (sugar in the raw) sugar in the middle of each custard. Gently tilt the ramekin and let gravity and gently shaking move the sugar around until the top surface of the custard is covered evenly with turbinado sugar. Using a kitchen butane torch, propane blow torch, or welding torch (whatever strong open flame you've got lying around), heat the sugar until it bubbles and changes color. With a small butane torch, I take my time and don't move from one side of the creme brulee to the other until the spot I've been working on has achieved the brown color that I want. This takes a little over a minute for each creme brulee. (The process is faster with a larger torch.) Don't worry about heating up the custard underneath, we'll refrigerate the creme brulee for a bit before serving. Do worry about lighting your kitchen counter on fire. I usually place the ramekin on a piece of aluminum foil placed over a cooling rack.
10. Once you're done scorching your cream, place the ramekins back in the refrigerator for about 45 minutes. The caramel will still be hard, but if you wait too much longer, the sugar will start to soften and dissolve into the custard.

Related link :
1. Egg Yolks Recipe # 1 : Clafoutis

6.22.2008

Baked Potato

Baked Potato

Especially for my friend, Fairly. As I promised you, here's the recipe. Easy and delicious! Hope it helps.

But I'm not really good at measuring, just makes everything balance, ok :) *sorry*

Baked Potato

Baked Potato
4 potatoes, cut, don't peel the potatos
olive oil
oregano
salt to taste
black pepper
water for boiling the potatoes

Directions :
1. Boil the potatoes until cooked but not being soft. Drain and set aside.
2. Prepare baking tray and brush with olive oil. Put the potatoes on it.
3. Sprinkle the potatoes with oregano, black pepper and salt to taste. And then drizzle them with olive oil.
4. Baked on the hot oven for 25-30 minutes until crisp and golden.
5. Serve hot.

This is another version from my dearest friend, Patricia.
And enjoy the variation of salads, here.

6.21.2008

Cooking Friday # 4 : Banana Chocolate Chips Cookies

Thanks to Vania for sharing this recipe. Say no more, just like you said, "this is the best cookies!"

Cookie Monsters

The kids absolutely love it. We are so addicted to these rich-chewy-cakey kind of cookies. I made twice and it didn't take long to dissapear from my cookie jar.

If you want to try, I suggest over-ripe banana for a strong banana flavour (the more spotted banana the tastier).

Enjoy the video!

Support us by visiting and leave comment in our podcast ;).

And here's the original recipe!

Banana Chocolate Chips Cookies

Banana-Walnut Chocolate-Chunk Cookies
Source : Martha Stewart's Cookies, The Very Best Treats to Bake and to Share via Vania's

Ingredients :
1 cup all- purpose flour
1/2 cup whole wheat flour
1 tsp coarse salt
1/2 tsp baking soda
3/4 cup (1 1/2 sticks) unsalted butter, room temperature
1/2 cup granulated sugar
1/2 cup packed light brown sugar
1 large egg
1 1/2 tsp pure vanilla extract
1/2 cup mashed ripe banana (about 1 large)
1 cup old-fashioned rolled oats
8 ounces semisweet chocolate, coarsely chopped into 1/2 inch chunks (~224 gr) (dita- I used chocolate chips)
1/2 cup coarsely chopped walnuts (about 2 ounces), toasted (dita-I used cashew nut)

Directions :
1. Preheat oven to 375 F. Whisk together both flours, salt and baking soda in a bowl.
2. Put butter and both sugars into the bowl of an electric mixer fitted with the paddle attachment; mix on medium speed until pale and fluffy. Reduce speed to low. Add egg and vanilla; mix until combined. Mix in banana. Add flour mixture just combined. Stir in oats, chocolate chunks, and walnut.
3. Using a 1 1/2 inch ice cream scoop, drop dough onto baking sheets lined with parchment paper, spacing about 2 inches apart. Bake cookies, rotating sheets halfway through, until golden brown and just set, 12-13 minutes. Let cool on sheets on wire racks 5 minutes. Transfer cookies to wire racks; let cool completely. Cookies can be stored in airtight containers at room temperature up to 2 days.
Makes about 3 dozen.

Another episodes :
1. Cooking Friday # 1 : Pie Crust
2. Cooking Friday # 2 : Banana Cake
3. Cooking Friday # 3 : Pizza Elmo (Baking with Kids)

6.20.2008

Egg Yolks Recipe # 1 : Clafoutis

I made french macarons 10 times and I hate the waste of egg yolks. I got confused what should I do with this! I didn't prepare myself to make some cake which needs a lot of egg yolks such as Indonesian Lapis Surabaya Cake or Lapis Legit (somekind of layer cake). Who would eat that? My kids don't really like that kind of cake.

After googling around I found some ideas to use the leftover egg yolks. The first recipe I've tried was Clafoutis. And it's cherry season here (oohhh how I love this kind of fruit), I decided to make cherry clafoutis.

Cherry

Clafoutis or clafouti (pronounced kla-foo-TEE) is a French country dessert from the Limousin region that has become very popular in North America. Traditionally it was made with the first sweet cherries of the season and the cherries were left unpitted so the kernels could release their delicate almond flavor as they baked (more about Clafoutis, here).

Actually that was not the first time for me making clafoutis. I did before with another flavor. Lemon and almond clafoutis. Yes! Not the real clafoutis I guess, because I didn't use cherry. But be creative, you can use another kind of fruits such as berries, rhubarbs, plums or peaches.

lemon & almond clafoutis 4/5
My first attempt on Clafoutis

I used the recipe from Joy of Baking.

Cherry and Almond Clafoutis

Cherry and Almond Clafoutis

Clafoutis Batter:
1/2 cup (70 grams) all purpose flour
1/4 teaspoon salt
2 large eggs (I used 3 eggyolks)
2 tablespoons (30 grams) granulated white sugar
3/4 cup (180 ml) milk (I used evaporated milk)
1/2 teaspoon pure vanilla extract
(dita) silvered almonds

Plus:
1 pound (454 grams) fresh sweet cherries, pitted
1 tablespoon (13 grams) unsalted butter
2 tablespoons (30 grams) granulated white sugar

Directions :
Preheat the oven to 425 degrees F (220 degrees C) and place the rack in the center of the oven. Wash the cherries, remove the stems and pits.

For the Clafoutis Batter: In your food processor or blender place all the batter ingredients. Process for about 45 - 60 seconds, scraping down the sides of the bowl as needed. Once the batter is completely smooth, let it rest while you prepare the fruit.

In a large 9- or 10- inch (23 or 25 cm) heavy nonstick ovenproof skillet melt the butter over medium heat making sure the melted butter coats the bottom and sides of the pan. When the butter is bubbling, add the pitted cherries, and cook until the cherries have softened a bit and are coated with butter (2 - 3 minutes). Then sprinkle the cherries with the sugar and cook until the sugar has dissolved and turns into a syrup (1 - 2 minutes). Pour the batter over the cherries (dita-sprinkle with silvered almonds) and bake for about 20 minutes or until the clafoutis is puffed, set, and golden brown around the edges. Do not open the oven door until the end of the baking time or it may collapse. Serve immediately with a dusting of confectioners sugar and yogurt, creme fraiche or softly whipped cream.

Serves 2 - 3.